


A website may go offline for various reasons, including scheduled maintenance or unexpected issues like server failures.
Having an offline website can be detrimental, regardless of the reason. Previously, only big corporations conducted online sales, but now websites and blogs of all sizes are earning money online. Even a brief period of website downtime can result in immediate revenue loss and other repercussions like decreased search rankings.
It is important to monitor the hosting uptime and receive alerts if your site goes down for various reasons.
We will learn about various effective tools for monitoring website uptime and setting up free site monitoring with notifications for downtime alerts in this article.
If you aim to ensure your website is continuously accessible, this article is tailored to you. Keep reading to learn more.
What does website hosting uptime refer to?
Uptime, also known as availability time, is the period during which a computer is connected and ready for use. In the context of website hosting, uptime specifically relates to the availability of the hosting server, indicating the duration it is operational and accessible on the web.
A hosting’s uptime is typically expressed as a percentage over a specific time period, such as a month. For instance, if a site has an uptime of 99.99% in a month, it means that it was offline for just over 4 minutes during that time.
To explore the topic further, refer to the article discussing the significance of uptime in your web hosting.
Monitoring the hosting uptime is crucial for various reasons.
Measuring a site’s uptime is crucial to prevent losses resulting from a website being offline. It is important to ensure that time and money invested in a project yield value, whether financial or not, by offering visitors access to content at all times.
The second reason is to respond promptly when an issue arises, enabling quick action such as contacting support, checking site settings, or performing emergency migration as soon as the problem is identified.
Having a website frequently offline can lead to a drop in search engine rankings, which can be discouraging when trying to achieve good visibility online.
Your online presence is crucial when it comes to impressing visitors and customers. People anticipate flawless functionality from websites, and even a brief period of inaccessibility can damage your reputation and drive customers to competitors.
Measuring a site’s uptime is important for various reasons.
- Prevent financial setbacks, such as a decrease in revenue or business decline.
- Act promptly in case of unavailability.
- Avoid ending up in low rankings on Google and other search engines.
- Avoid harming your reputation or business.
A website can be offline for various reasons, which are not discussed here. For more information, I suggest reading our article “Dealing with an Offline Site: Solutions and Prevention.” 😉
Importance and methods of website backup.
Monitoring tools for tracking the availability of web hosting or a website
Plato famously stated that necessity drives innovation. The creation of the internet brought about new challenges, such as the requirement to monitor the uptime of hosting services or websites.
Fortunately, there are multiple tools available to address this problem. Later, we will discuss setting up website or hosting monitoring after presenting a few of these tools.
UptimeRobot is a monitoring service.
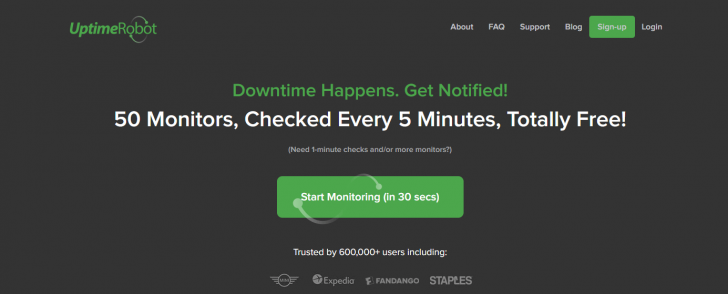
UptimeRobot is a widely used tool for monitoring website uptime, likely due to its availability as a free service. Established in 2010 by a team of developers focused solely on gaining experience.
In 2015, UptimeRobot introduced a paid option known as the “Pro Plan,” which did not impact the availability of the free plan, still in place today. Both plans enable monitoring of up to 50 sites, with variances in features like monitoring frequency (5 minutes in the free plan and 1 minute in the Pro plan).
UptimeRobot does not offer a mobile app, but it enables users to receive notifications by integrating with different external services, a feature accessible across all subscription plans.
The table below shows a comparison of the UptimeRobot plans’ features.
| Resources/Planes | Free | Pro |
|---|---|---|
| Verification of each | 5 minutes | 1 minute |
| Monitored Sites | 50 | 50 (or more on demand) |
| Historical History | 2 months | 1 year |
| SMS or call notice | No | 20 |
| Certificate Monitoring SSL | No | Yeah. |
| Rules for notifications | No | Yeah. |
| Configure maintenance window | No | Yeah. |
| Custom HTTP Headers | No | Yeah. |
| Price | Free | $4.50/month (annual plan) |
Visit the UptimeRobot website or refer to this article for more information and a tutorial on the tool.
PingDom
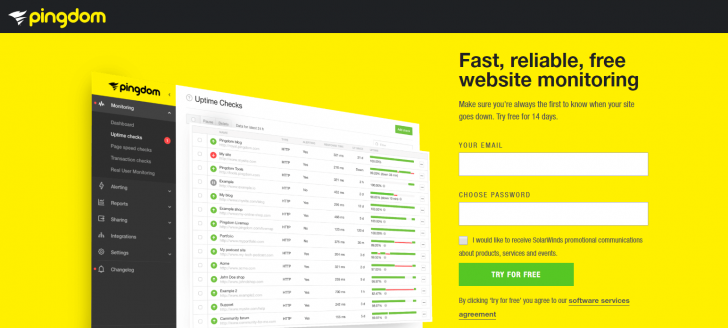
PingDom, established in 2007, is a popular tool for tracking hosting uptime. Over the years, it has developed into a comprehensive monitoring platform that offers more than just uptime monitoring. Subscriptions also cover performance monitoring, transaction monitoring, and real-time user monitoring.
PingDom provides more advanced features compared to UptimeRobot, including the option to select the server location for monitoring. Brazil is included in the list of server locations, which is beneficial. Additionally, PingDom offers a mobile app for monitoring and receiving alerts.
PingDom does not offer a free plan anymore, as each of their features come with a corresponding cost. They used to have a free plan that allowed monitoring of one site, but it has been discontinued.
Below is a comparison table showcasing the primary features and pricing of PingDom.
| Resources/Planes | Starter | Standard | Advanced | Professional |
|---|---|---|---|---|
| Monitored Sites | 10 | 50 | 80 | 250. |
| Verification of each | 1 minute | 1 minute | 1 minute | 1 minute |
| Historical History | Unlimited | Unlimited | Unlimited | Unlimited |
| Monitoring location selection | Yeah. | Yeah. | Yeah. | Yeah. |
| Certificate Monitoring SSL | Yeah. | Yeah. | Yeah. | Yeah. |
| SMS Notice | 50 | 200 | 350. | 500 |
| Transaction tracking | 1 | 3 | 5 | 25 |
| User tracking | 100 thousand | 500 thousand | 1 million | 5 million |
| Price (per month in the annual cycle) | $1,95 | $30 | $72 | $199 |
To learn more, go to the PingDom website.
WordPress JetPack plugin
chsyys/StockVault

JetPack is more than just a monitoring tool; it serves as a built-in feature that effectively meets that need. Created by Automattic, the creators of WordPress, JetPack is essentially a package of features for the CMS.
JetPack is a standard feature on all WordPress websites and can also be installed as a plugin on self-hosted WordPress sites.
JetPack monitoring is essential for WordPress installations, especially for those hosted outside the WordPress.com platform, as they may experience instability due to various factors such as plan limitations and resource overuse.
JetPack offers a free plan with many resources included, along with various paid plans that provide additional features. The table below shows a comparison of the main features across JetPack plans.
| Resources/Planes | Free | Staff | Premium | Professional |
|---|---|---|---|---|
| Website monitoring | Yeah. | Yeah. | Yeah. | Yeah. |
| WordPress Themes | +100 | +100 | +100 | +200 |
| CDN (for static files) | Yeah. | Yeah. | Yeah. | Yeah. |
| Image Hosting | Yeah. | Yeah. | Yeah. | Yeah. |
| Attack Protection | Yeah. | Yeah. | Yeah. | Yeah. |
| Daily website backup | No | Yeah. | Yeah. | Yeah. |
| Scanning malware | No | No | Yeah. | Yeah. |
| Price (per month in the annual cycle) | Free | $ 12,42 | $ 31,95 | $ 102.95 |
JetPack combines various tools for your website. Prior to installation, consider if you will utilize most of these features. If you only need to monitor site uptime, JetPack may offer more than necessary.
To find out more about the plugin, you can read our review of Jetpack or visit the plugin’s website.
If you want a paid JetPack plan, visit the WordPress.com coupon page for potential discounts. 😉
Monitoring uptime at no cost
Now that we have explored three excellent choices for monitoring a website, let’s look at how to track hosting uptime using the no-cost UptimeRobot tool.
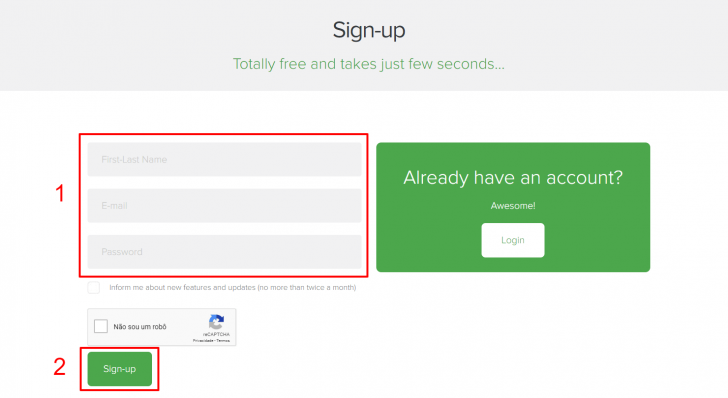
Create an account for free on UptimeRobot.
The initial step involves setting up an account on UptimeRobot, which can be done by visiting the website and selecting the Sign-up option located in the top corner of the page.
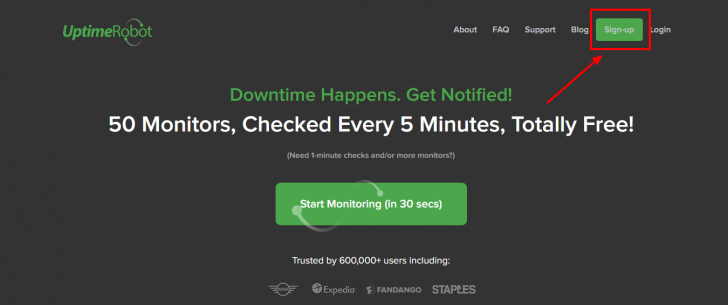
On the following page, complete the registration form by providing your name, email, and preferred password. Finally, click on the Sign-up button.
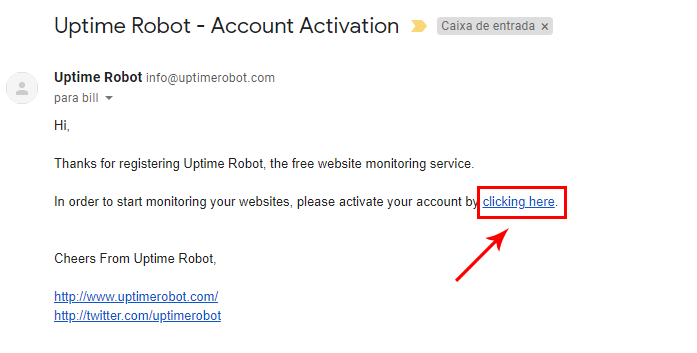
2. Validate your subscription
After filling out and sending the form, you need to verify your registration through an email sent to the inbox you used for registration. Look for the UptimeRobot validation email titled “Uptime Robot – Account Activation.”
Open the email and click on the provided link to confirm the creation of your account.
You will be guided to the login page where you can log in using the email address and password you recently set up to reach the UptimeRobot dashboard.
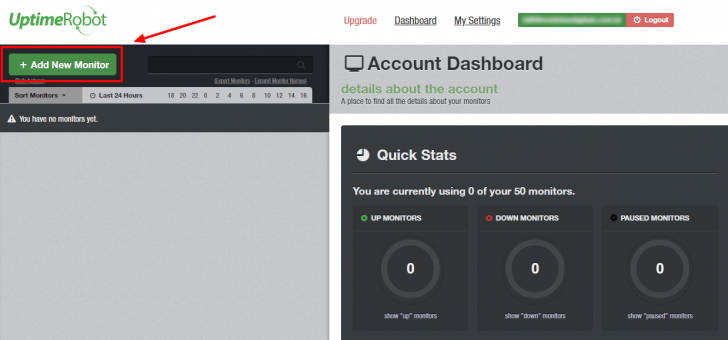
3. Include a website for tracking.
Once you have set up your account, you can begin adding a website to track its uptime. Keep in mind that the free plan allows you to set up to 50 unique monitors.
Click the Add New Monitor button in the top left corner of the screen to set up a monitoring system.
chsyys/ShutterStock
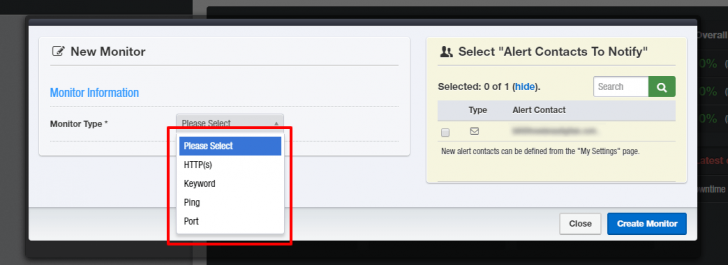
Start by selecting the preferred monitoring type in the window that appears. I will provide further clarification on the distinctions between them. Opt for the HTTP(S) choice if you wish to monitor a website.
chsyys/Pexels
After selecting the type of monitor, provide a name for identification in the Friendly Name section. In the URL (or IP) section, enter the website homepage address (e.g., https://www.site.com) or a particular page you wish to monitor (e.g., https://www.site.com/page-X). Ensure to include the complete URL format with the site protocol (HTTP or HTTPS).
Choose the preferred monitoring interval on this screen to increase monitoring accuracy. Opting for a smaller range results in more precise monitoring. In the free plan, the shortest interval available is 5 minutes. This setting allows UptimeRobot to check your site every 5 minutes, capturing response statuses for uptime analysis.
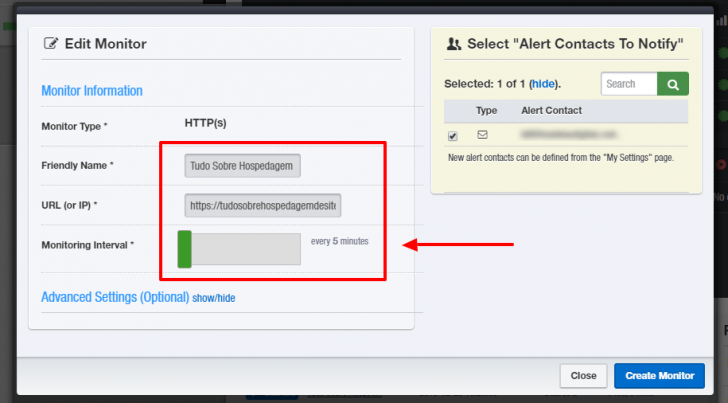
The monitoring range on Pro plan for the plane can extend up to 1 minute, while in the free mode, you can utilize the 5-minute range to monitor the accommodation’s uptime.
Activate notifications from UptimeRobot
In the monitoring setup window, there is an orange section labeled Alert Contacts To Notify. Here, users can specify if they want to receive notifications for this monitoring. Notifications can be sent when a site goes offline and when it comes back online.
Other types of notifications can be enabled in the UptimeRobot settings area in addition to email alerts, which are displayed by default. I will explain how to add different notification channels shortly. For now, check the box next to the registration email to finish setting up the initial monitoring.
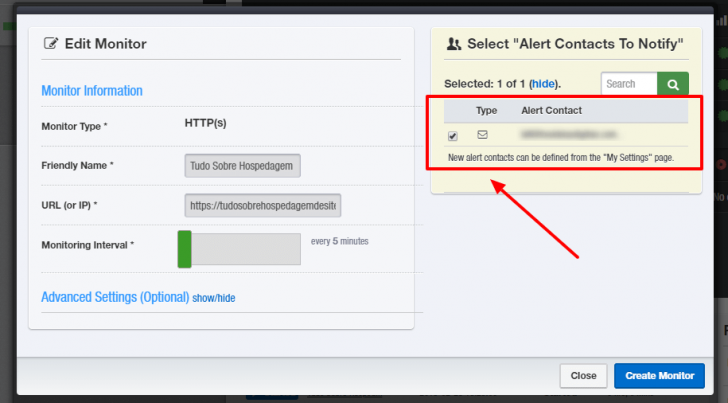
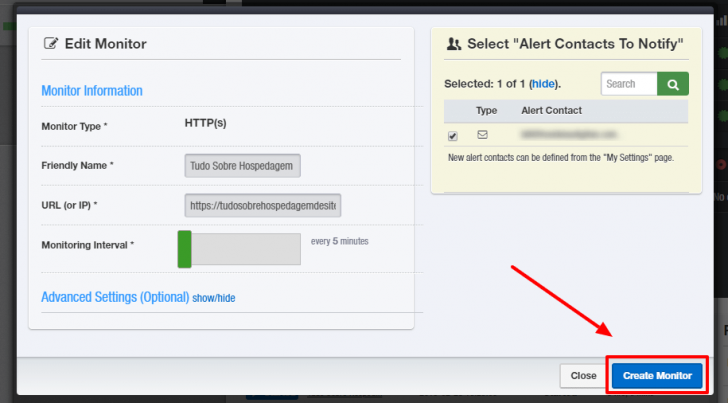
Click the Create Monitor button after filling out all the details and activating email notifications. This action initiates the recording of information by the UptimeRobot system.
Configuring push notifications on UptimeRobot for Android or iOS devices.
Email alerts may not be the most effective way to receive immediate notifications about a website being down, especially for businesses that operate solely online and require timely alerts for site issues.
A highly effective method for receiving notifications is through the push method, where alerts are sent directly to mobile devices, like the notifications from social media platforms such as Facebook and Instagram.
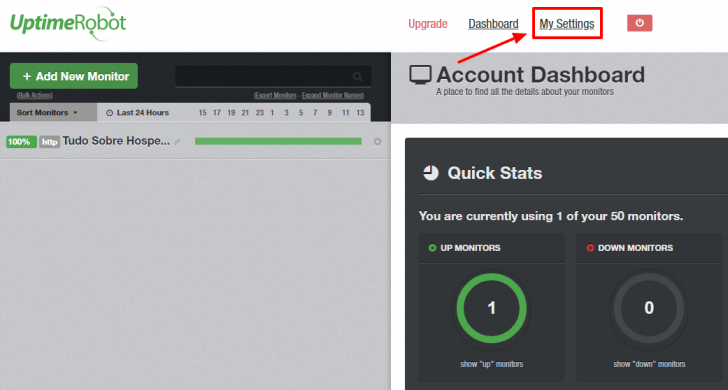
UptimeRobot enables the setup of push notifications through integration with external services at no cost. Instructions on how to configure this integration will be provided.
Navigate to the My Settings option located at the top of the UptimeRobot dashboard.
chsyys/FreeImages
Once you are in the settings section, locate the Alert Contacts section and select Add Alert Contact.
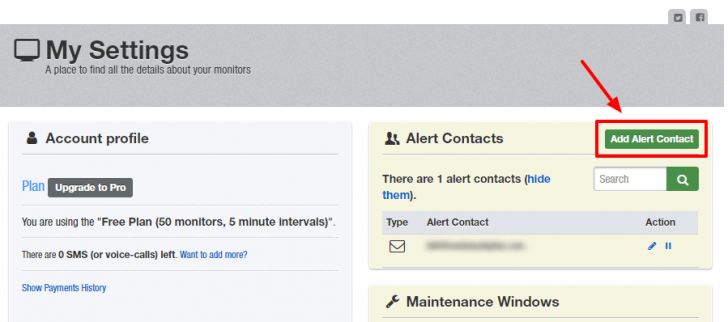
Choose the notification type you wish to set up from the menu that appears. Various options are provided for selection.
- SMS feature is available exclusively in the Pro plan.
- Voice Call is available exclusively on the Pro plan and refers to making phone calls.
- Webhook designed for custom applications
- Email-to-SMS service for telecommunication providers.
- Publish a tweet on Twitter that mentions the user you provide.
- Telegram message
- Slack is a messaging platform.
- Microsoft Teams is a communication and collaboration platform.
- Google Hangouts Chat is a communication platform created by Google.
- HipChat
- Pushbullet app
- Easy target
- Boxing 2
- Zapier is a platform.
We will set up the Pushbullet feature, which is a notification service that links various devices. When a notification is received on the platform, it can be forwarded to chosen devices like Android or iOS phones, web browsers, SMS, and more.
To get started, you need to register an account on www.pushbullet. with. Upon registration, select either Google or Facebook as your login method; other options are not available.

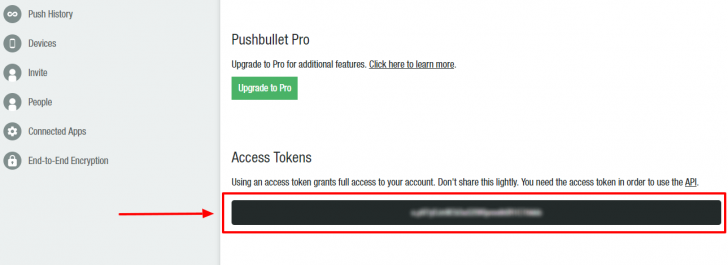
Set up your devices and download the Pushbullet app on your mobile phone. Navigate to the Settings section in the Pushbullet dashboard and locate Access Tokens. Generate an access token by clicking on the Create Access Token option, which will be required for UptimeRobot.

A dark background box is shown with an access token inside. You should copy the text within the box to activate UptimeRobot notifications.
After duplicating the token, go back to the UptimeRobot dashboard and complete the details to enable notifications. Specify the alert type as Pushbullet, assign a name for the alert (Friendly Name), and input the Pushbullet Access Token. Additionally, you can choose to receive both up and down notifications, only down notifications, or only up notifications.
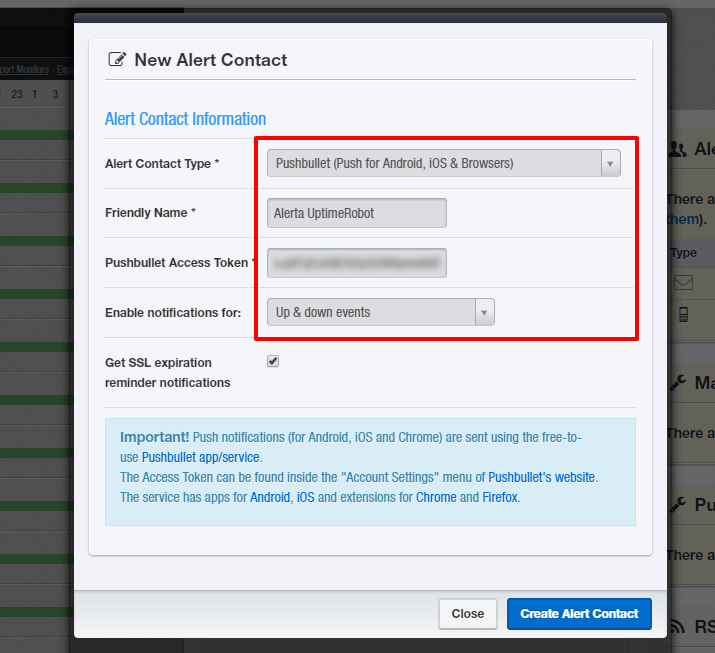
If you have the Pro plan, you can activate the SSL expiry reminder notifications feature to receive alerts before your SSL certificate expires. This feature is exclusive to the paid plan.
Click on Create Alert Contact after finishing the selections to establish the new notification method.
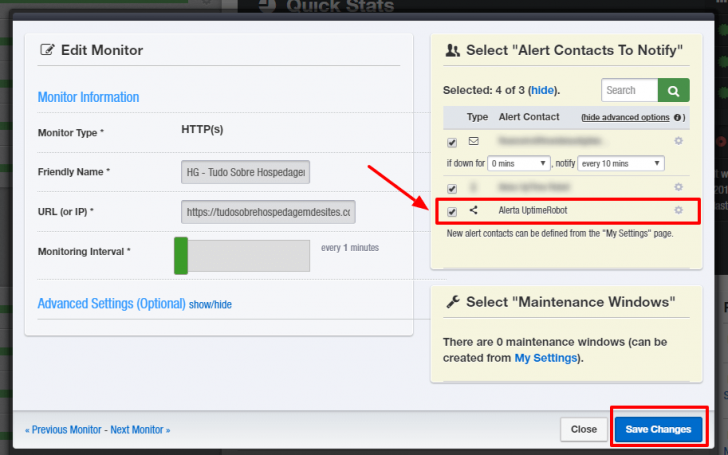
To enable push notifications, add this feature to the existing monitoring by clicking on the gear icon next to the site name and selecting Edit.

Mark the checkbox next to the notification you created in the open window. Locate the name you assigned to the notification, then save the changes after checking the box.
If you have completed the steps and set up Pushbullet correctly, you will receive notifications when your website goes down. You can also monitor your hosting uptime over time.
Monitor your website’s activity.
The Account Dashboard in UptimeRobot shows users a summary of their account and monitoring activities, including a chart that indicates the status of websites being monitored.
chsyys/Pexels
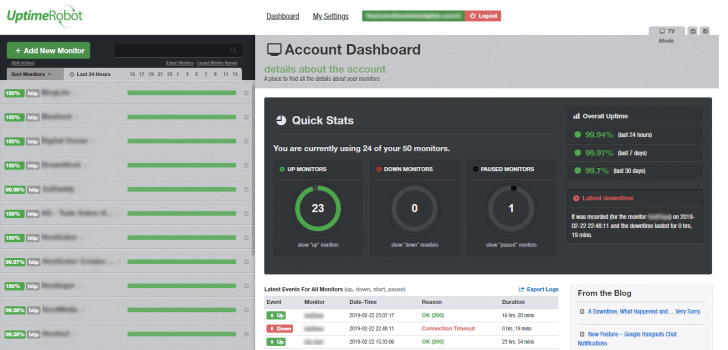
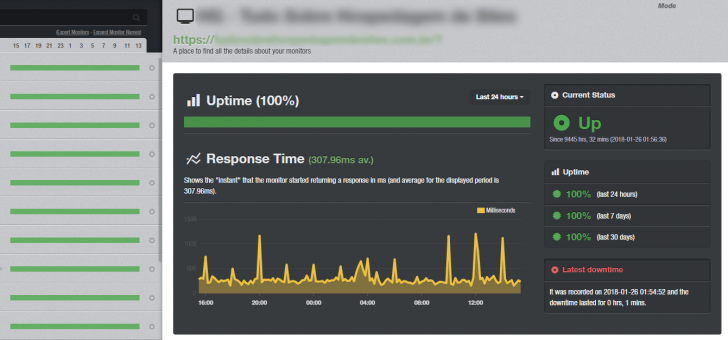
To view how long a particular website has been up, click on it from the list on the left side of the page. The brief summary chart will then transition to display the uptime information for that specific site. By default, only the previous 24 hours of monitoring data are shown, but you can extend this timeframe by selecting a different period after clicking on Last 24 hours. Keep in mind that in the free plan, only the most recent 2 months of data are saved.
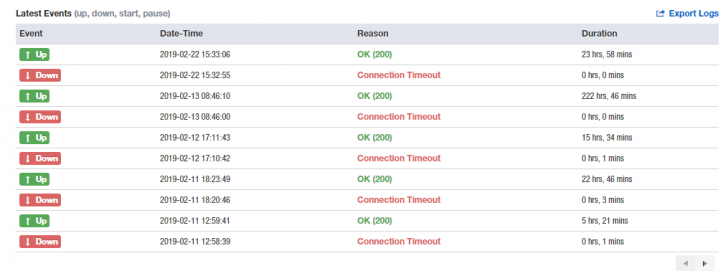
Below the chart, there is a record of recent monitoring events. This log can be viewed on the dashboard homepage and for individual sites, showing details like incident timing, site status changes, and monitoring activity. The homepage log includes all monitoring events, while the site-specific log only shows events for that particular site.
chsyys/Flickr
Understand the Different Types of UptimeRobot Monitoring
UptimeRobot provides different monitoring options, which we will explore to determine the best choice for each scenario.
- HTTP(S) is the preferred way to monitor websites as it mimics a visitor’s request, generating response headers from the site to indicate its status. This method allows UptimeRobot to accurately log any issues that may occur.
- The ping method is suggested for monitoring servers by sending a ping request to a specific IP address. Unlike the HTTP(S) method, it only verifies server response without indicating an error code. It is not advisable for websites as servers may respond to pings even if the website is offline in some instances.
- This technique checks if a specific word is present on a webpage, which can be useful for detecting site hacking by monitoring content changes.
- UptimeRobot monitors a designated port of a domain or IP in Port mode, suggesting monitoring of services like email and FTP within hosting environments.
Create a public webpage displaying the uptime of your website if desired.
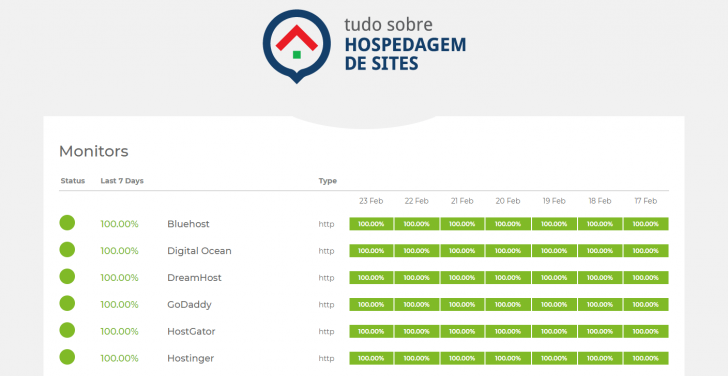
UptimeRobot offers a feature to generate a public uptime page, beneficial for businesses providing SaaS applications wanting a public space for users to check service status.
The page can have its own address (e.g. status.domain.com) and the company logo can be added. Although visual customization is limited in features, the page’s appearance is quite good, as shown in the example below.
To set it up, visit the UptimeRobot settings section in (My Settings) and select the Add Public Status Page feature.
Please indicate whether you wish to add all websites to your account or only select ones and provide a name for the page. Adding a logo is not mandatory. If you choose to do so, ensure the image does not exceed 400 x 200 pixels.
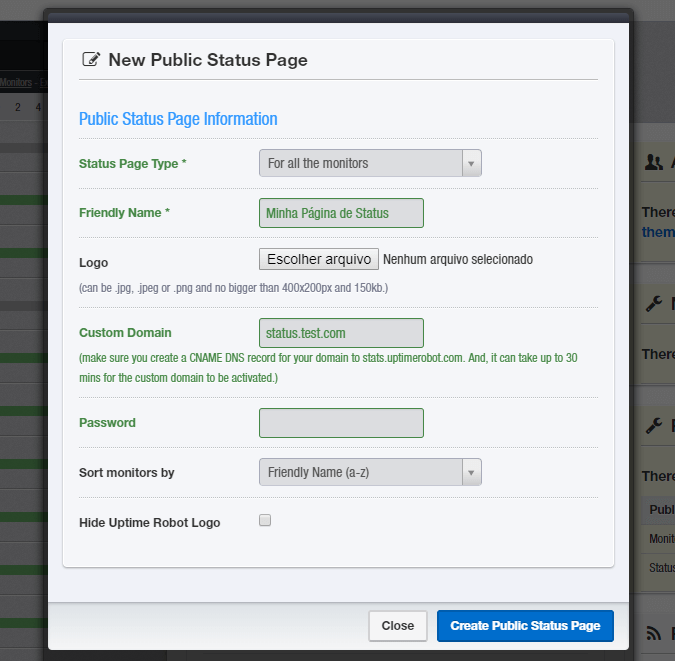
To create a personalized address for your property, such as a domain or subdomain, you just need to direct a CNAME entry to the stats.uptimerobot address. If you don’t specify a custom address, UptimeRobot will provide a default address that functions similarly.
A password can be set up for the page, requiring visitors to enter it to access the uptime status. This security measure is useful when limiting access to a specific group. Just enter the chosen password in the designated field to enable protection.
The outcome is a compact website that shows the status of all tracked sites on the main page. Users can explore the sites and access additional information about the uptime of each by clicking on the site name.
Summary
Monitoring the availability of hosting or a website has become convenient and accessible with the help of different services. It is beneficial to have trustworthy and cost-free options like UptimeRobot and JetPack.
It is essential for numerous online businesses to ensure their website functions properly at all times and respond promptly if it becomes unavailable.
If your current hosting provider’s uptime is not meeting your needs, it might be a good idea to consider switching. Our team constantly monitors the uptime of top hosting companies and provides a list of the best ones with high monthly uptime and a 100% availability guarantee.
Leave a comment if you have any inquiries, I’d be happy to assist! 🙂
Publication date: 06/03/2019 (last modified on 31/05/2023)
Tags: Instructional guides