


Having an SSL certificate used to be costly and difficult to install, but with initiatives like Let’s Encrypt, it has become easier and more accessible.
If you want to set up Let’s Encrypt yourself, this article provides a detailed guide on how to install the certificate. It also covers companies that offer automatic installation of Let’s Encrypt for those seeking more convenience.
Remain with us to discover. 🙂
Why should I set up an SSL certificate from Let’s Encrypt?
An SSL certificate is crucial for website security, safeguarding data exchanged between the server and users. It enhances communication confidentiality and overall site security. Chrome labels HTTP sites as “unsafe,” underscoring the significance of SSL. Furthermore, SSL-enabled sites receive preferential treatment in Google search rankings compared to those lacking this feature.
Let’s Encrypt is free and available to anyone with a domain and hosting that meets the criteria. Developed collaboratively by tech giants like Google, Cisco, Facebook, and Mozilla, this certificate is trustworthy despite being cost-free.
Since its launch, over 50 million SSL Let’s Encrypt certificates have been issued, which is quite impressive, wouldn’t you say?
Now that you have decided to utilize Let’s Encrypt for your website, let’s explore the process of installing the certificate in two different methods: manually or via a hosting provider.
Prerequisites needed for manually installing an SSL certificate from Let’s Encrypt
It is crucial to understand the requirements for installing Let’s Encrypt on your hosting before you begin.
You must have shell (or ssh) access and administrative rights on your hosting server. While a few shared hosts permit ssh connectivity to the server, many do not provide administrator privileges (root access), which are typically only available on dedicated VPS servers and cloud hosting.
Shared hosting clients can still take advantage of the service through companies that provide automatic and free Let’s Encrypt installation. Click here to find out which companies offer this feature.
The presence of a valid domain pointed to the server is essential for installing Let’s Encrypt, as the certificate issuance relies on automated server testing to verify the domain ownership.
If you satisfy the requirements listed above, we are prepared to proceed with the installation of an SSL certificate from Let’s Encrypt.
Install the Let’s Encrypt certificate manually.
The described steps were carried out on a VPS provided by DigitalOcean running Ubuntu 16.04 and using the Apache web server. If your setup differs, it is advisable to consult the relevant documentation.
Learn more: DigitalOcean review – understanding how this cloud hosting service operates
Access your server using SSH.
To begin, access your hosting server via the terminal and input the provided command with your specific details.
Connect to the server by using SSH with the following command: $ ssh user@server_ip_or_url
DigitalOcean advises against utilizing the root user for this task and suggests creating a new user with admin privileges. Instructions on how to do this can be found here.
Step 2: Set up Certbot
Let’s Encrypt suggests using Certbot as the preferred tool for creating and installing certificates on your server. Certbot is a user-friendly program that efficiently handles certificate issuance and installation, with detailed setup guidance available on its official website for different servers and systems.
We will adhere to the installation guidelines for Ubuntu with Apache by adding the Certbot repository initially.
Add the Certbot repository using the following command: $ sudo add-apt-repository ppa:certbot/certbot
Press Enter to agree to the terms and refresh the list of packages.
Update using sudo apt-get.
Finally, finish installing Certbot for Apache.
Install python-certbot-apache using the following command: $ sudo apt-get install python-certbot-apache
Perform the issuance and installation of SSL certificates in step 3.
Now that Certbot is installed, it is time to generate the certificate. The process is quick and straightforward, requiring only one command and some information for the Certbot client to complete the entire procedure.
Enter the provided command in the terminal and hit Enter to execute it, ensuring to substitute the sample domain with your own.
Use “sudo certbot –apache -d mydomain.com -d www.mydomain.com” with your domain name.
We are issuing a certificate for both the primary domain and the www subdomain in this instance.
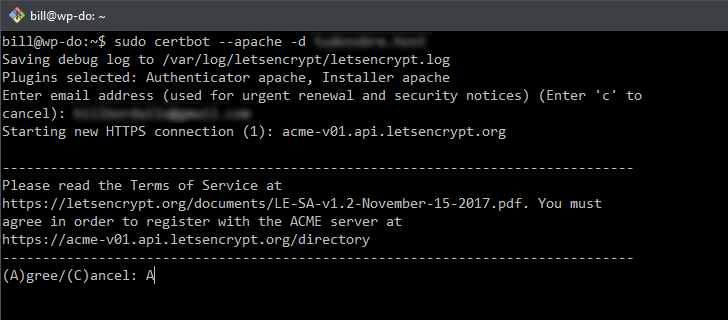
After executing the command, you will be prompted to enter certain details in the terminal. The initial requirement is to input a contact email address, which will be utilized for sending notifications regarding certificate renewal and security advisories. Simply type in the email and hit Enter.

You should agree to the terms of service by entering the letter A (for agree) as displayed in the image.
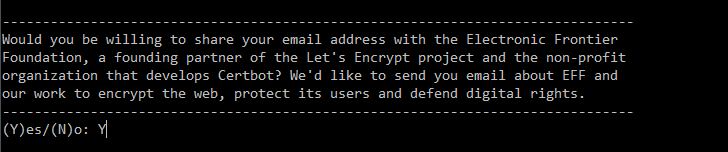
The program will inquire if you would like to provide your email to the Electronic Frontier Foundation, the organization behind Certbot. If you consent, they will send updates regarding your activities. You can proceed by selecting either yes (Y) or no (N) and hitting Enter.
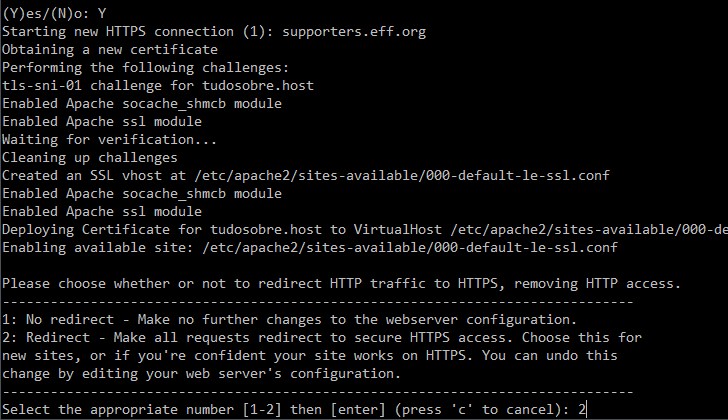
After these verifications, the certification process will commence, allowing you to monitor your progress on the screen. Prior to completion, you must indicate whether you wish for website traffic to be directed entirely to the secure HTTPS version or if you prefer to maintain the current setup without redirection.
I recommend selecting option 2 and redirecting all traffic to use the HTTPS protocol unless there is a specific reason not to do so. To do this, enter 2 in the terminal and press Enter.
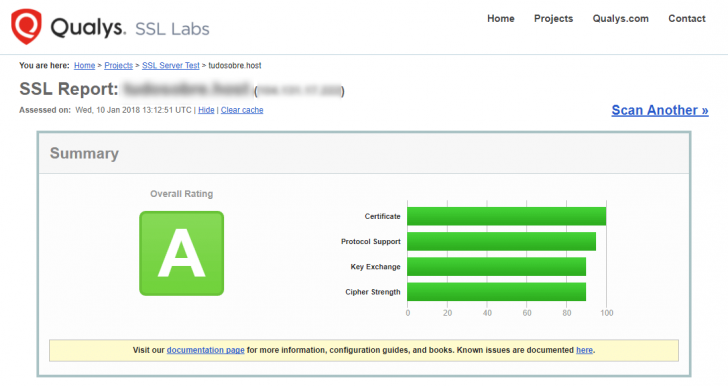
After receiving the latest response, the certificate should be fully operational. To verify quickly, visit your domain’s root URL using the secure protocol (https://yoursite.). For a comprehensive certificate check, access the following link and replace the example with your domain.
A comprehensive examination will be produced, as demonstrated in the example provided.
Ensure that automatic renewal is set up.
Let’s Encrypt issues certificates with a 90-day validity period, but this is not an issue as they are usually automatically renewed.
Certbot is set to set up automatic renewal for Let’s Encrypt before the certificate expires, providing daily updates on the expiration date. If the expiration date is within 30 days, the certificate will be renewed.
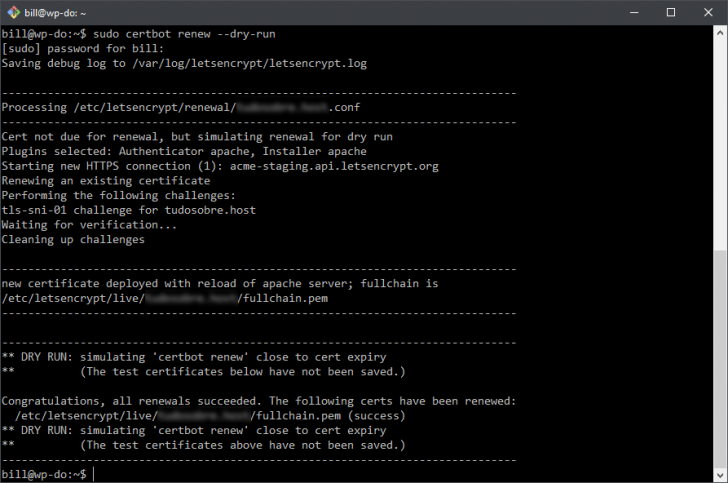
To verify that the scheduling is configured accurately, execute the command provided:
Run the following command with administrative privileges to check for certificate renewal without actually renewing it: $ sudo certbot renew –dry-run
The $ certbot renew command is in charge of verifying and renewing Let’s Encrypt. Using the flag –dry-run in the example triggers the script in a testing mode, simulating the renewal process without actually renewing it.
If there are any scheduling issues, a warning will be displayed on the screen. Otherwise, upon successful completion of the test, you will see the following output.
chsyys/FreeImages
If there are any issues with renewing the certificate, you will be notified via the email you provided when initiating the process.
Install the certificate using a hosting provider as another option.
If you find this tutorial too complex or have any other reason for not wanting to do the Let’s Encrypt installation yourself, there are other options available. One straightforward option is to use a hosting provider that offers the SSL Let’s Encrypt certificate installation feature.
Several national and international companies offer pre-configured automatic installers in the hosting environment, with a designated area in the hosting control panel for installing Let’s Encrypt certificates when the feature is enabled.
Some of the key Brazilian companies that back Let’s Encrypt are emphasized below:
- KingHost was one of the first to offer free SSL Let’s Encrypt, with automatic installation accessible through the control panel for all shared hosting and cloud plans.
- UOL Host provides Let’s Encrypt for automatic installation using the hosting control panel, with a 45% discount available on their website.
Let’s Encrypt can be used with various international hosting providers.
- DreamHost provides Let’s Encrypt on all hosting plans, with installation possible through the control panel.
- SiteGround has provided Let’s Encrypt since February 2016, starting with shared accounts and now offering it to all customers across all plans.
- WP Engine provides Let’s Encrypt on all plans, which are only compatible with WordPress websites.
Conclusion.
Installing an SSL certificate can be affordable and straightforward, particularly with Let’s Encrypt. The process can be quite easy, which developers and network administrators may find enjoyable.
If you’re not comfortable using the terminal, you can opt for automatic SSL installation provided by a hosting company. The list of options may be limited now, but it is expected to grow in the future.
If your hosting provider does not support SSL Let’s Encrypt, contact them to recommend adding this feature. You can also refer to a list of companies that can install the certificate by following this link.
After you have installed the Let’s Encrypt certificate, the following step involves setting up your website to operate entirely using the HTTPS protocol. Users of WordPress can benefit from a tutorial on configuring SSL in WordPress.
If you encountered challenges while installing Let’s Encrypt or have any questions, feel free to leave a comment for assistance.
Publication date: January 16, 2018 (last modified on January 26, 2022)
Tags: Let’s Encrypt, SSL, Guides