


Creating a website has become simple due to the variety of tools offered in the market. Google Sites, although less popular, is one such tool available for this purpose.
Google Sites is a website building platform developed by Google, accessible at no cost to all users with a Google account, including Google Workspace users. The available resources for building websites are consistent across both user types.
Google Sites stands out for its ability to enable users to set up a personalized domain name for their website, in addition to being a no-cost platform.
The only requirements to use a custom domain on Google Sites are owning a domain and having a website published on Google Sites. Once you have these two elements, you can fully utilize Google Sites.
If you do not yet possess a domain, follow these steps to acquire one. Explore our top choices for national and international domain registration services.
To set up a personalized domain on Google Sites, consult the provided tutorial. 🙂
Contents
- 1. Make a fresh website using Google Sites.
- Publish the website.
- Configure a custom domain on Google Sites using a different method than the usual one.
- Custom URL configuration on Google Sites can be set up through a different route.
- Verify the domain ownership in the webmaster center.
- Access the zone for editing the DNS domain.
- Return to the webmaster’s hub and verify the domain.
- Return to Google Sites and proceed with entering the personalized domain.
- Wait a brief period and then go to your website.
- How to establish the non-www version on Google Sites
- In conclusion.
- Customizing URL configuration on Google Sites through a different route
Also check out: 10 advantages of using Google Workspace for professionals and businesses.
1. Make a fresh website using Google Sites.
If you have already made the site, proceed to step 2. Otherwise, refer to a comprehensive guide on creating a free site on Google Sites or follow the instructions provided.
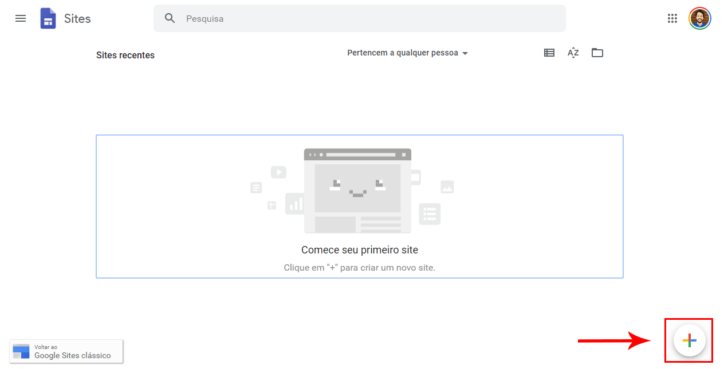
Visit the service page on websites.google.com and sign in using your Google or Google Workspace account. The homepage dashboard will show the list of your existing sites. If there are none, simply click the “+” icon at the bottom of the page.
You have the freedom to create multiple websites and experiment with the tool effortlessly. The interface for building Google Sites is user-friendly and straightforward, with editing features similar to those in Google Drive Presentations. The main focus is on the page view, while the right column houses the feature menu, layouts for pages, options for adding new pages, and customizing the site’s overall look with themes.
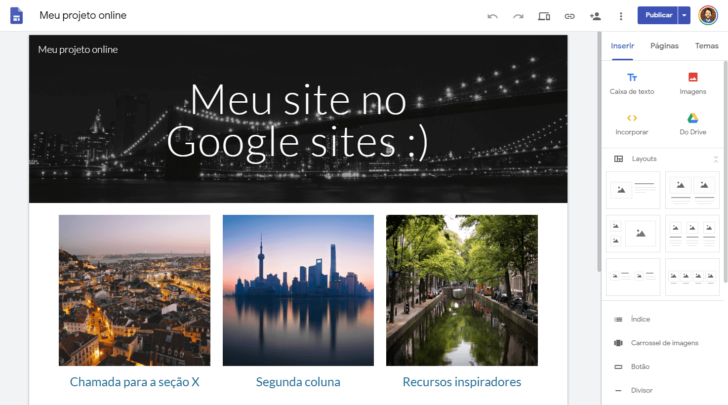
Don’t anticipate finding advanced functionalities like Wix in Google Sites, yet it’s ideal for crafting straightforward institutional websites. All Google Sites are responsive, adjusting to various device screens for seamless navigation on computers, tablets, and mobile phones.
Publish the website.
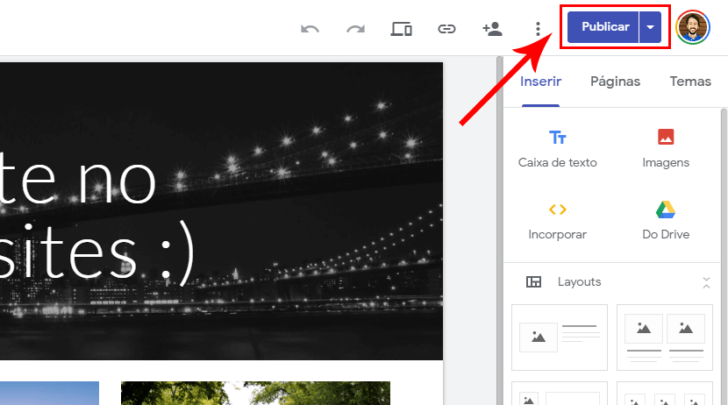
Customize as desired and when you’re done, select “Publish” in the top right corner. While a custom domain is not available on Google Sites at the moment, it will be implemented later on.
A new window will appear displaying the publishing choices. The initial section, “Web Address,” pertains to the site’s address that will be linked to Google Sites. This address is given to all websites built on the platform, enabling you to publish the site without a personalized domain by modifying only the end of the URL. Upon clicking publish, your site will be reachable through an address such as https://sites.google.com/view/my-online-project/.
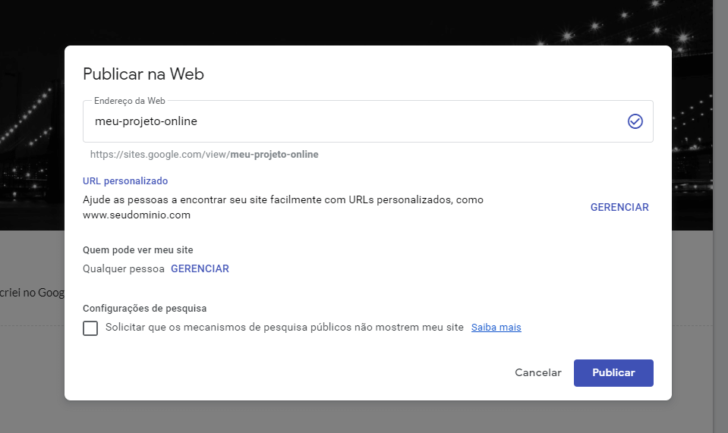
The “custom URL” field is where we can establish a domain for the website by clicking on the “Manage” option and following the provided steps.
The “Who can see my site” feature lets you choose who can view your site, whether it’s the public or specific individuals. It functions in a similar way to sharing files on Google Drive. If you want your site to be visible to everyone, choose the “Anyone” option.
If you do not wish for your website to appear in search results, select the option “request that public search engines do not display my site” at the bottom of the window. Avoid using this option if your website’s purpose is to attract new visitors.
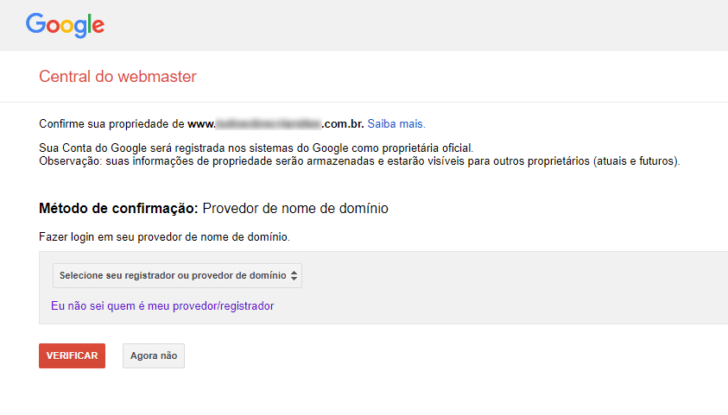
Set up a personalized domain on Google Sites.
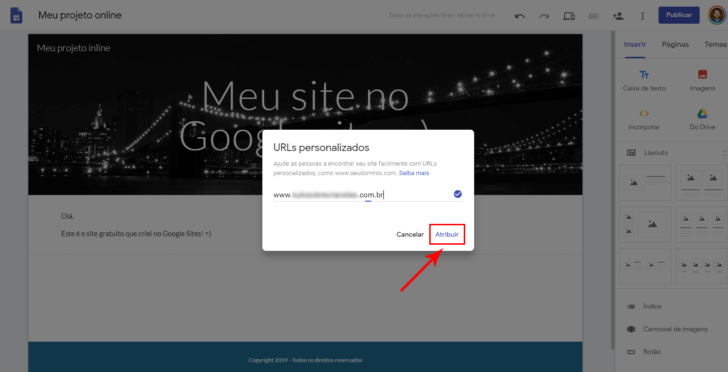
In the same settings window, when you click on “Manage” in the “Custom URL” section, a small window will appear where you can enter the domain you wish to configure.
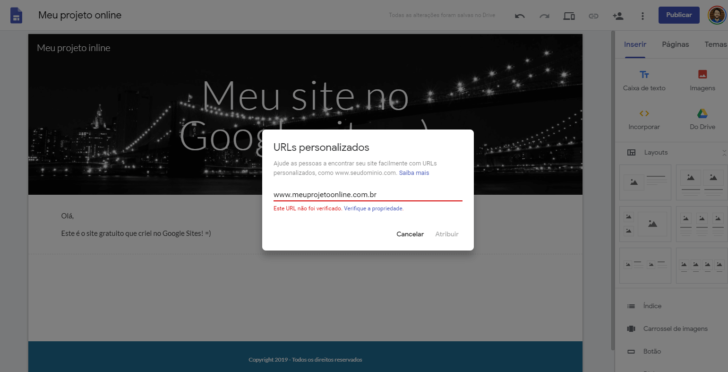
Please ensure to input the required domain in the format www.domain with the dot. It is crucial to include “www” before the domain.
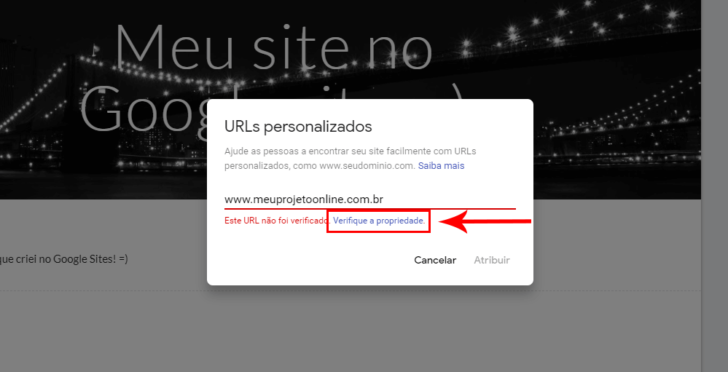
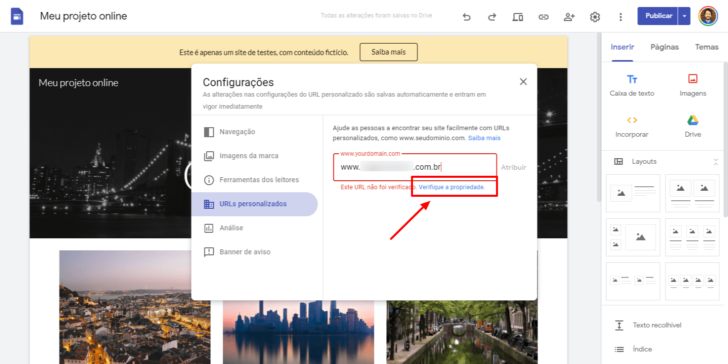
Upon initial use of the domain, a caution message reading “This URL has not been checked” will display below the field. This notification indicates that the domain must undergo verification on the Google Webmaster platform. Simply click on the “Check the property” link to proceed.
chsyys/iStock
Custom URL configuration alternative pathway on Google Sites
If your website is live or you do not plan to publish it right away, there is an alternative way to access the custom URL settings on Google Sites.
Click the sprocket in the upper right corner of the screen to open the Google Sites settings screen. Look for the “Custom URLs” section in the window.
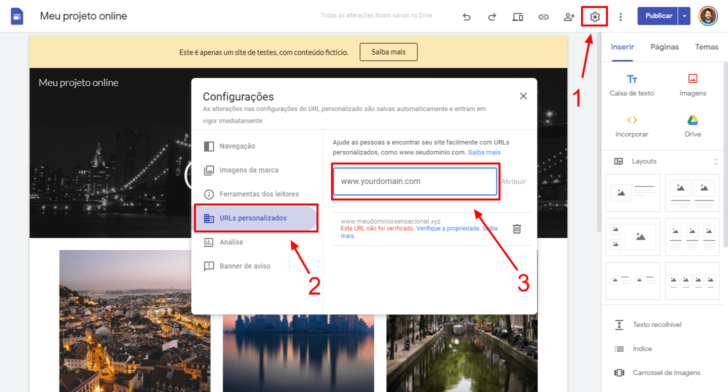
Once you find the relevant section, input the preferred domain and proceed with the tutorial steps to confirm the domain ownership.
chsyys/DepositPhotos
The steps to verify and configure the domain on Google Sites are the same as those described below from this point onward.
4. Verify the domain ownership in the webmaster center.
By clicking the link, you will be taken to the webmaster’s hub, where you can find guidance for verifying your domain. The standard procedure involves adding a TXT record to your domain’s DNS settings. Typically, domain registrars provide an admin panel for this purpose, but if the domain is for hosting, management should be carried out in the hosting panel instead.
chsyys/Flickr
Click the checkbox and select a service provider from the list where you registered the domain to view the required TXT value. If your domain provider is not listed, simply choose “other” to see the instructions on the screen.
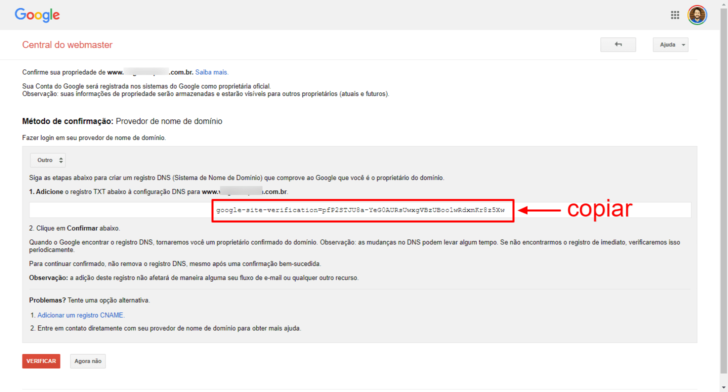
Copy the code displayed on the screen and insert it into the designated location for domain registration or DNS administration, as outlined in the following procedure.
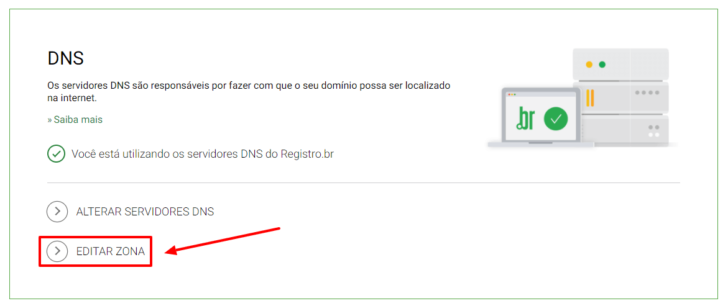
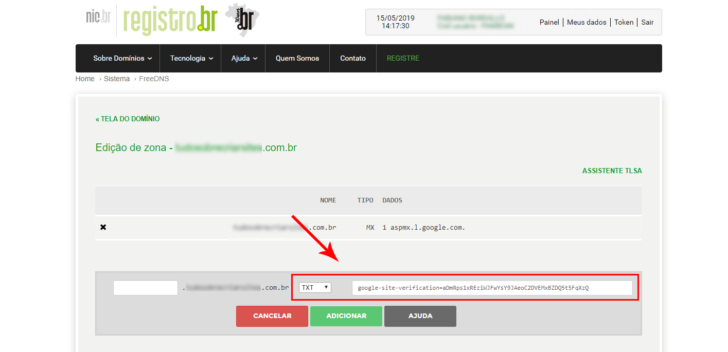
Access the DNS editing zone for the domain.
Copy the code from the webmaster’s center and access your domain administration location. For instance, let’s use Registry.br as an example. In the Registry Administration Panel, select the desired domain and click on “Edit Zone” link.
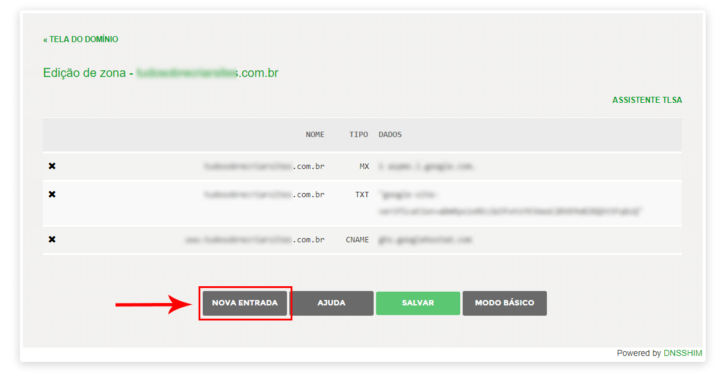
Click on “New Input” in the editing screen within the zone.
If the screen does not match the one depicted, your management panel might be in “basic mode,” limiting access to advanced settings. Switch to “advanced mode” to access the zone editing panel.
chsyys/UnPlash
Select the “TXT” option, check the box, and input the code from Google into the designated box, leaving the initial field empty.
Click once more on “New Input” and input a CNAME entry containing www as the value in the first field and ghs.googlehosted. in the second field.
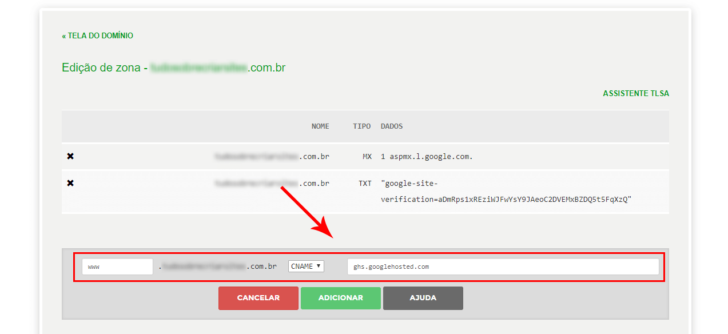
The TXT entry is necessary to validate the domain, while the CNAME entry directs the www address to Google Sites servers.
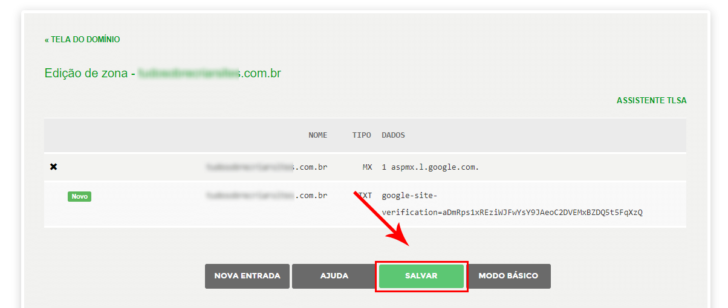
After entering a value, click on “Add” followed by “Save”.
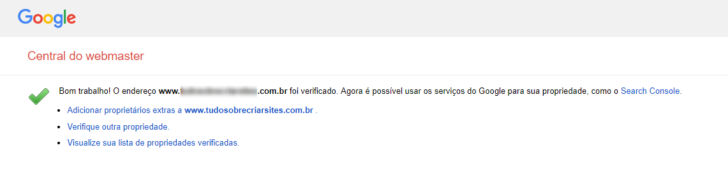
6. Go back to the webmaster’s center and verify the domain.
After adding the TXT record in the DNS control panel, go back to the Webmaster center panel and select the “check” option located at the bottom of the page.
Google may take some time to recognize the TXT value added to the domain, which can range from a few minutes to a few hours. This delay occurs because of how the domain system operates. If you encounter a message saying “it was not possible to check the domain,” simply wait a bit and attempt again.
After verification is successful, a warning will be shown in the webmaster’s center, like the following example.
Go back to Google Sites and proceed with entering the personalized domain.
Return to Google Sites after verifying the domain property and input the address again in the custom URL field. Click “Assign” to link the domain to the site without encountering an unverified domain notice this time.
If you revisit the publishing settings window, you will notice that the unique address is shown below the statement “When published, this site will also be available in.”
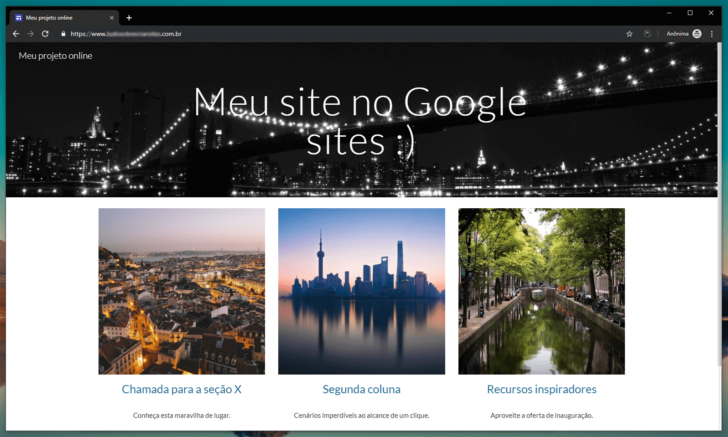
Click the “Publish” button to make the website accessible at the custom address.

Visit your site after a short delay of eight seconds.
After following the steps mentioned, your website should be accessible shortly with the custom domain on Google Sites. Please note that the publication may not be instantaneous due to the DNS propagation time and the automatic issuance of an SSL certificate for your domain. No action is required from your end for this process.
After waiting a few minutes, open a new browser tab and visit the website address you have configured. Make sure to include the www version, like www.mywebsite.com.br. If it’s not accessible yet, wait a bit and try again.
If you have successfully completed all the steps, your website will be published and automatically directed to the HTTPS version of the URL.
How to configure the “no www” version on Google Sites
Google Sites limits the configuration of the main domain to subdomains only, such as www.mydomain.com, and does not allow setting up the naked version of the domain like mydomain.com.
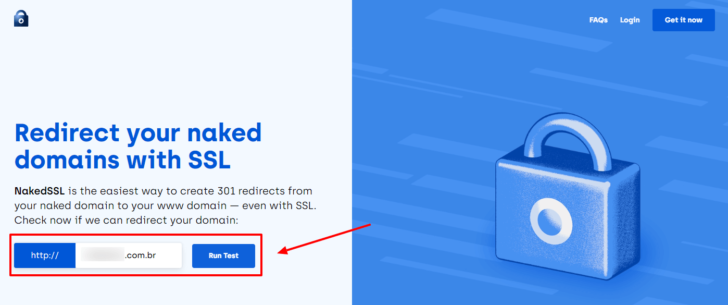
It is fortunate that it is possible to bypass this restriction by utilizing external redirect services. A convenient and practical choice for this is the Naked SSL service, a recommended tool by a reader named Luiz in a comment. It is a redirect service that offers a free option for redirecting one domain.
To set up the redirect, just go to the nakedssl website, enter the main domain in the appropriate field, and click on Run Test to verify domain usability.
chsyys/FreeImages
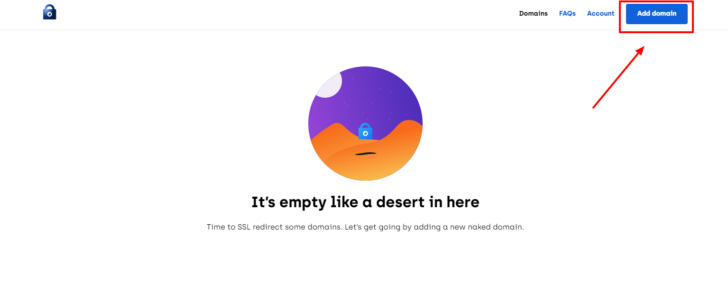
If the domain is in good condition, click Let’s Go to begin the setup.
A quick registration process is required, involving providing your name, email, and creating a password. Once registered and after clicking the confirmation link sent via email, you can add your domain by selecting the Add Domain button.
Please enter the naked domain in the first field on the following page, for example, mydomain.com.br. In the second field, provide the URL you have established on Google Sites, like www.mydomain.com.br.
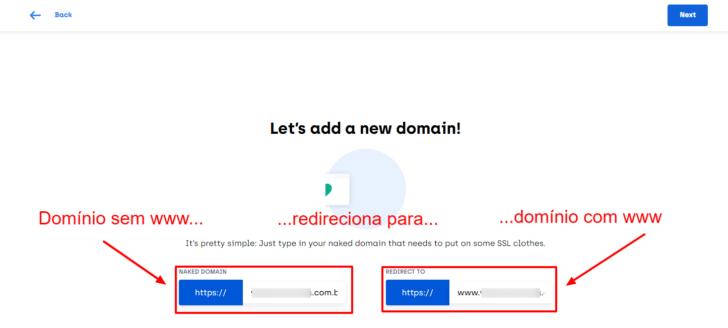
chsyys/Flickr
Choose the server location as USA and decide whether you want to enable any type of cache.
After making these selections, the last setup screen will be displayed. To ensure the redirection functions correctly, you must paste the specified target IP address (as shown in the accompanying image) and configure an input type to point to that IP address.

Simply go back to the DNS zone management panel and input the necessary information following the same steps outlined in the tutorial. If your domain is registered with Registry.br, input the information as shown in the example provided.
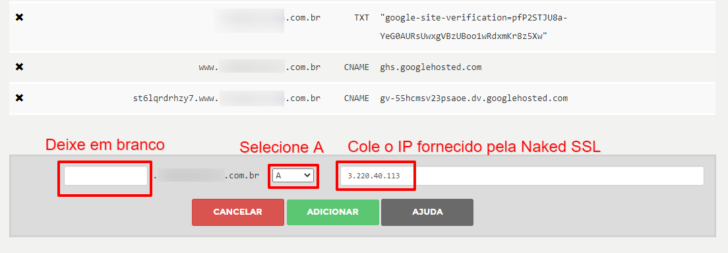
After entering information, be sure to include the updates and save them.
If this extra step is completed successfully, your website will soon be running in both the naked version and the version with www (or any other subdomain you have selected).
In summary
We learned in this tutorial how to link a personalized domain on Google Sites, which can benefit many users due to its free access, user-friendly interface, and range of resources.
Google Sites is available at no cost to individuals with a Google account or Google Workspace subscribers. If you encounter any challenges or have inquiries about configuring Google Sites, feel free to leave a comment for assistance.
If you are developing a business website, make sure to check out our review of Google Workspace, a platform designed for company use.
Publication date: May 17, 2019 (latest update on July 31, 2023)
Google, Google Sites, and Google Workspace are associated with tags.