


It is becoming more and more important for individuals and businesses to have a professional email address in order to establish credibility with customers and partners. Setting up a domain and creating personalized email accounts is a crucial step for any contemporary company.
Zoho Mail is a professional email service with over 30 million users, offering various plans for users to choose from or opt for a free account, as discussed in this article.
If you need a strong and free professional email service for yourself or your business, learn how to sign up and activate it here.
Compare different email providers to select the most suitable professional email service.
What is Zoho Mail?
Zoho Mail is the corporate email service included in the Zoho Workplace app suite, which originated as a CRM service but now encompasses numerous applications aimed at providing comprehensive business management tools, including email services.
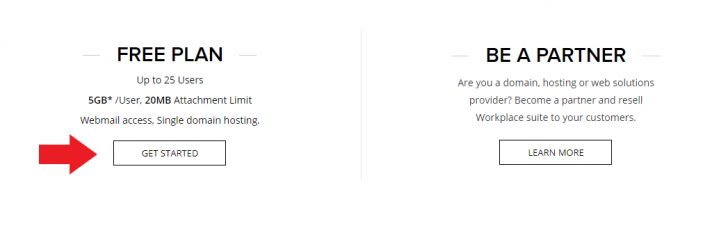
Zoho Mail can be bought independently from the Zoho Workplace package in four different tiers, each offering varying limits and features. For example, the free plan provides 5 GB of space per user, whereas the Business plan allows up to 50 GB per user.
For more information on the distinctions between plans and our evaluation of the service, refer to this review by Zoho Mail. If you prefer, you can access the service page directly.
Characteristics of the no-cost Zoho Mail package
The complimentary Zoho Mail plan is a suitable option for individuals or businesses lacking a professional email service. Depending on your company’s size and email usage, it could be utilized for an extended period without charge.
Here are the characteristics of Zoho’s no-cost email package for you to analyze.
- You can make up to 5 email accounts under the same domain for a maximum of 5 users.
- 5 gigabytes allocated for each user for emails, attachments, and Zoho Docs files.
- Attachments of up to 25 MB can be included in emails.
- You can access a feature-rich platform using your browser to read and send emails for free.
- You can set up your smartphone or tablet to send and receive emails for mobile access.
- Only one domain, such as mycompany.com, can be established on the free plan.
Who is the free plan suitable for?
The free Zoho Mail plan is suitable for professionals and businesses seeking a custom domain email (e.g., name@company.com) without the need for an initial investment. Given the plan’s limitations, particularly in terms of user quantity, it appears to be tailored for small enterprises.
If you’re uncertain about the service or concerned about potential future upgrades, it’s advisable to try out the service as it’s free. The only upfront cost would be for domain registration if you don’t already have one.
It is essential to have a registered domain to use Zoho Mail for free. If you haven’t registered a domain yet, you can do it on the Zoho platform or through a domain registration company. Setting up the email is straightforward, as explained later in the article.
What is the best option for registering a domain: a hosting company or a registration service?
How to sign up for a complimentary subscription
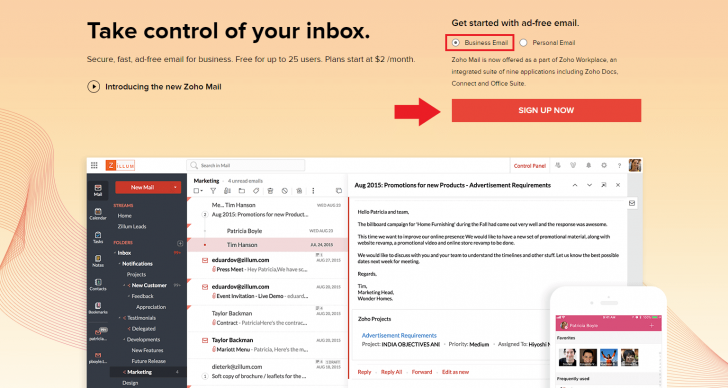
To sign up for and begin using a no-cost Zoho Mail plan, the initial action is to visit the service page on the Zoho website. A key point to note is that at the time of writing this article, the free plan is visible solely on the English page. If you switch to Portuguese, the free choice will not be displayed. An initial suggestion is to avoid selecting the Portuguese language option.
You will find a page at the address provided that looks like the one shown below. Choose the Selected Business Email option and then click on the Sign Up Now button.
The following page shows all Zoho Mail plans, with the free plan not immediately visible. So, scroll down to find the Free Plan option, then click Get Started to begin signing up for the free plan.
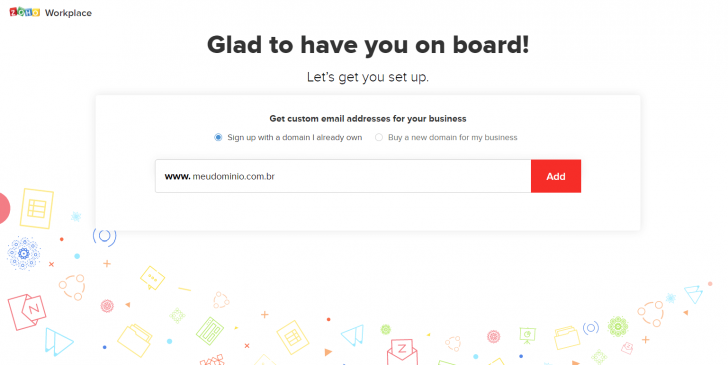
In the following stage, you need to specify the domain where you want to create the professional email. If you have an existing domain, choose the “Sign up with a domain I already own” option.
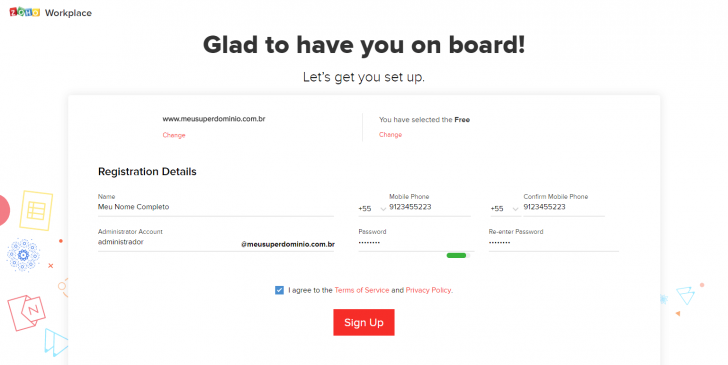
Provide the service administrator’s details on the following screen, including their name and mobile number. Ensure the mobile number is accessible as it will be required for account creation. Additionally, set up a login email address (which should be linked to the new domain) and a password.
chsyys/GettyImages
After completing this stage, a code will be sent to the phone number you provided. You need to input this code to proceed with setting up the account.
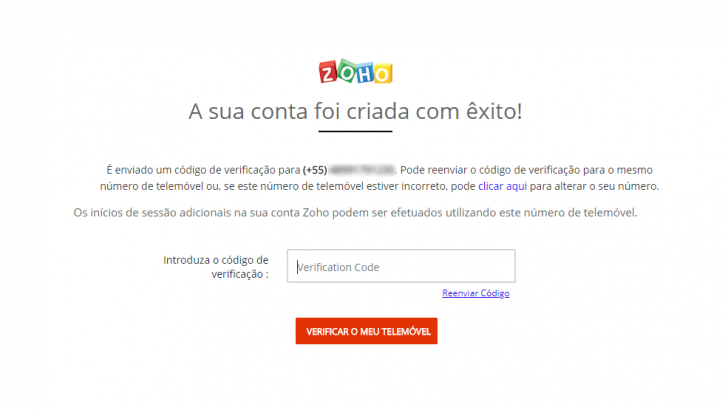
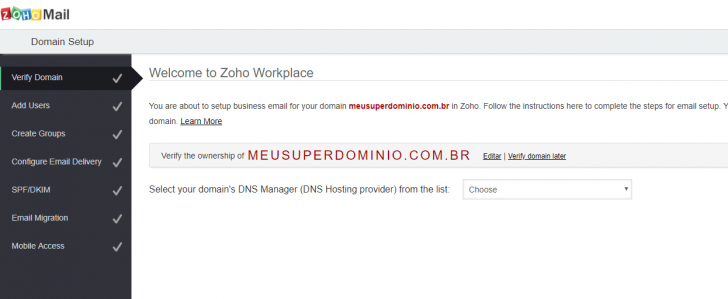
After entering the verification code, your account will be established. You will then be guided through a step-by-step service configuration process, with a full list of steps displayed in the left column.
- Verify Domain (confirm domain)
- Add Users to the system.
- Create Groups (establish groups)
- Set up Email Delivery (set up email sending)
- Configure SPF and DKIM protocols.
- Email Migration refers to the process of transferring emails from one system to another.
- Mobile Access (mobile access)
In reality, you don’t have to complete all the steps for the email to function, but certain settings are crucial. Essential steps include confirming the domain and setting up email delivery. It is also advised to check SPF/DKIM security for email deliverability.
We will now learn how to carry out the setup of these procedures.
Domain authentication
It is essential to complete the initial phase of Zoho email setup, which requires confirming access to domain administration.
There are three choices available for verifying a domain: CNAME, TXT, or HTML. CNAME and TXT involve adding a corresponding entry to the domain’s DNS settings. The HTML option requires uploading a file to the hosting server linked to the domain. This method is applicable only if you have hosting associated with the domain; otherwise, one of the other options should be used.
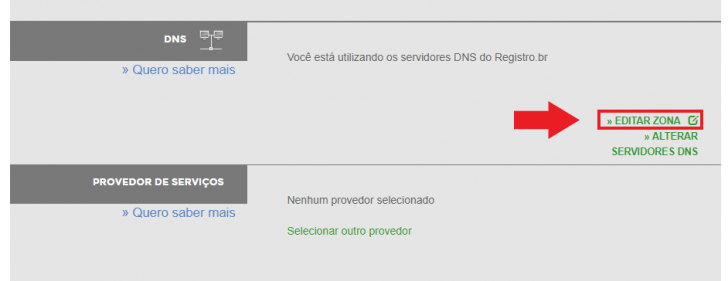
We chose to use CNAME verification in this tutorial. To add the CNAME record, access the Registry system where our domain is registered. This process can be done in any company where your domain is registered.
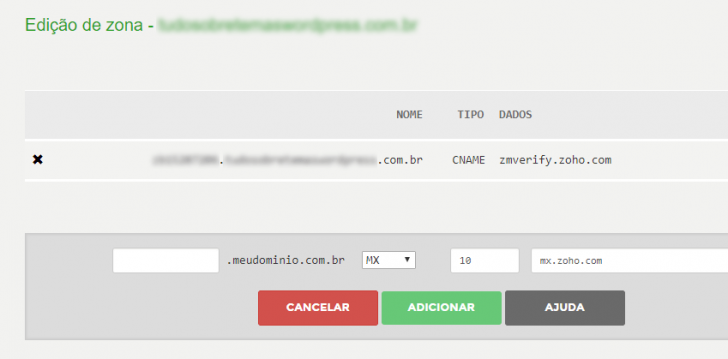
To perform the process, access the Registry system and select the desired domain from the domain list.

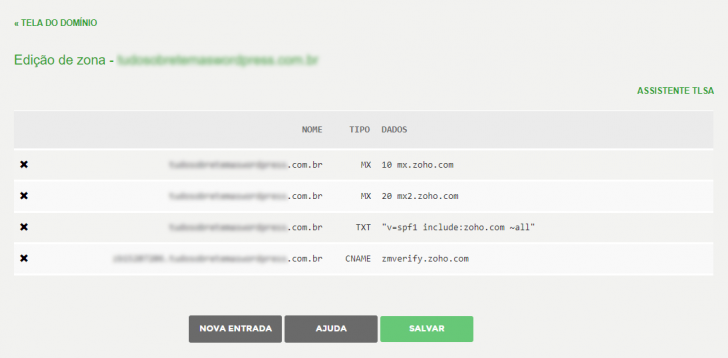
Scroll down on the screen and select the Edit zone link within the DNS box.
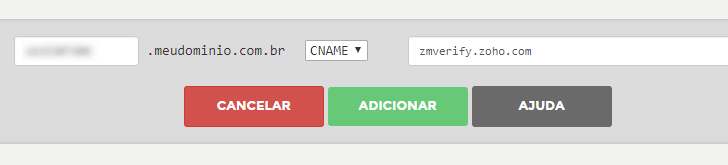
Click the New Input button in the Zone Edit screen and select the CNAME option from the checkbox. Fill in the CNAME details given by Zoho in the appropriate fields, as shown in the image.
Click on Add followed by Save. The validation of the domain post this step relies on the distribution of DNS across the internet, a process that may require several hours. Use this time to engage in other tasks.
You can check if the spread has taken place by returning to the Zoho panel and selecting the Proceed to CNAME Verification button. If you see a successful message, everything is set up correctly, and you can proceed. If not, wait a bit longer and attempt again.
Set up email delivery
You can skip creating users and groups during domain validation by clicking the Skip button. Users can be added later through the admin panel. However, setting up email delivery configuration is essential to receive emails in your new inbox.
Go to the Configure Email Delivery step on the Zoho configuration screen to adjust the settings. The screen will display the MX type values required for entry in your domain’s DNS zone.
The process is like the one done for domain validation, but this time we will add two MX records instead of a CNAME entry.
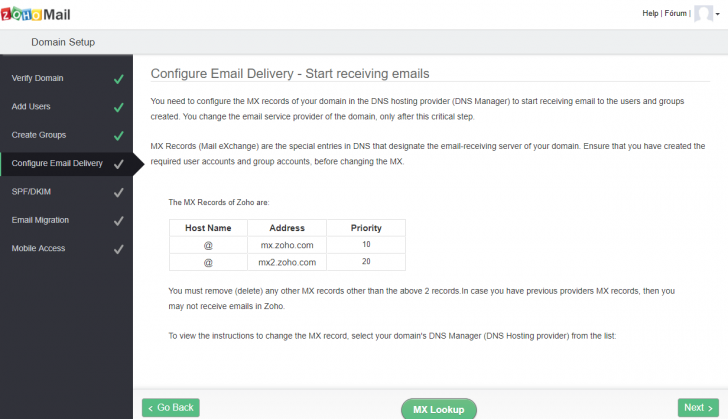
Go back to the DNS zone editing section of the domain registrar where you registered your domain, such as Registry.br, and input the MX entries based on the values from Zoho.
Save the modification in the panel after inputting the values.

To confirm the successful setup, return to the Zoho dashboard and select the MX Lookup option. The system will verify the MX values entered and display confirmation on the screen if the changes were successful.
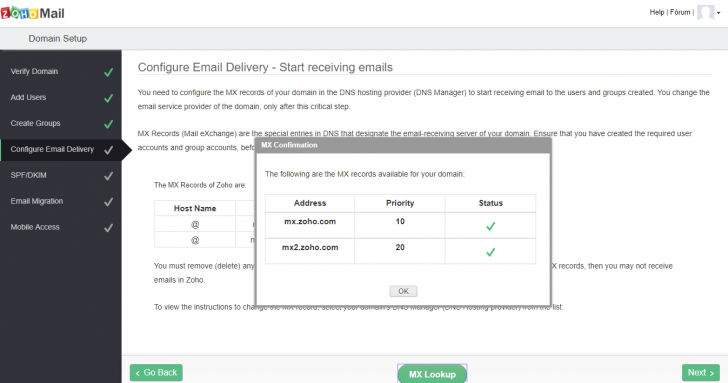
If the confirmation is not immediate, wait a couple of hours and attempt once more.
Email Delivery Preferences Additional Options
After completing domain validation and setting up delivery, you can begin sending and receiving emails using Zoho Mail within your domain. It is advisable to perform an additional validation to enhance email delivery within your domain. Neglecting these validations raises the risk of your emails being marked as spam by email providers.
One way to prevent this is through SPF validation, also known as Sender Policy Framework. To validate, you just need to add a new entry to your DNS zone using the provided value in the TXT type.
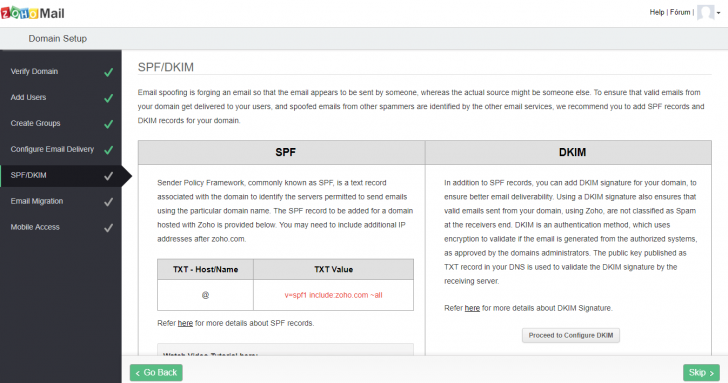
The detailed guidelines for configuring the SPF can be found on the SPF/DKIM section of the Zoho admin panel.
Establish a DKIM public key for verification purposes.
Setting up a public DKIM key for sender validation is an additional feature worth exploring. The setup process is more intricate compared to SPF, as it involves creating the key prior to adding the TXT value. Detailed guidelines for configuring DKIM can be found on the dashboard page, along with a helpful video demonstrating the setup process.
If you opt out of configuring DKIM, you will likely not encounter issues when sending the email; this is merely a suggestion. Therefore, feel at liberty to assess and make a decision.
After setting up the fundamental email sending and receiving configurations in Zoho, you can proceed to create email accounts, which is the primary purpose of the tool.
You can view each stage of this setup process by using the Go Back and Next buttons. Once you complete the final step, you will be taken to the Zoho Mail administration panel.
Panel of Directors
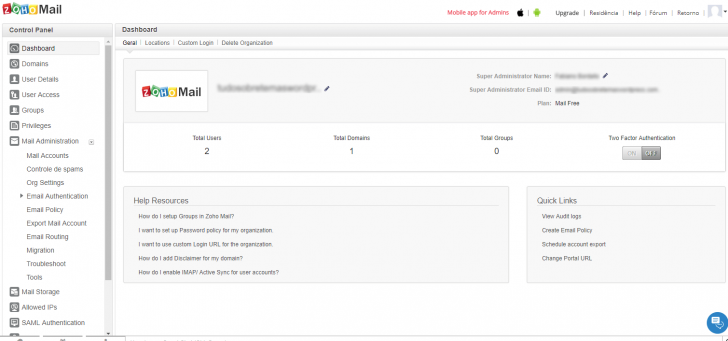
Only account administrators in Zoho Mail have access to the admin panel. When you create an account, you are automatically designated as an administrator user. Additional administrators can be added later if needed.
The Dashboard, known as the home page, shows an overview of your domain’s email service, including details like the number of accounts set up, groups, and two-factor authentication status. On the left side, you can find the main navigation for accessing all account administration features, including those listed in the initial setup section.
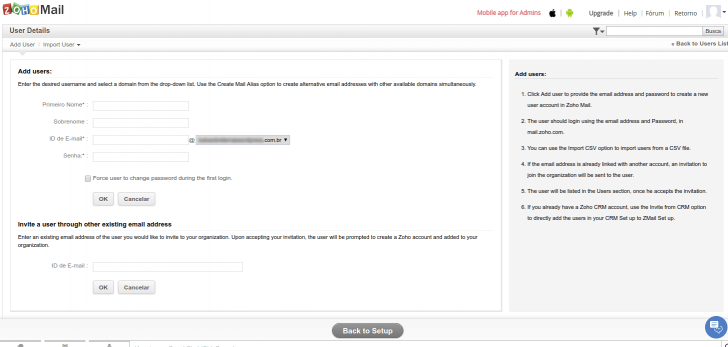
To set up email account users, navigate to the User Details section. If there are no existing users, only your name will be displayed. Simply click on the Add User button, located in the initial tab of the User Details section, to add a new user.
Clicking Add User will bring up the user input form, where essential details such as name, domain-based email, and password must be provided for user registration. Additionally, multiple users can be added through CSV file import or via the Zoho CRM feature.
chsyys/FreePik
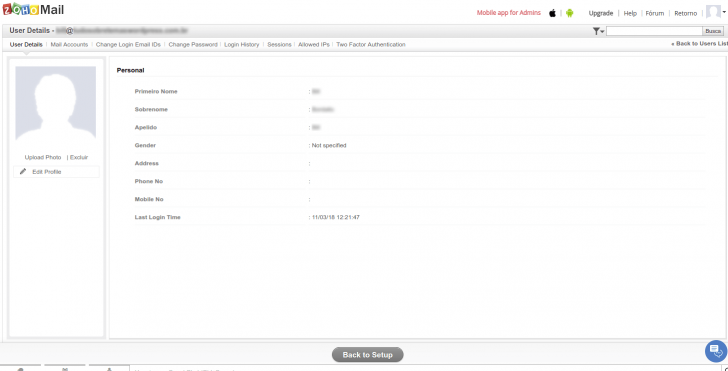
After a user is created, their details can be viewed on the User Details page list. To modify other user attributes, simply click on their name to access various editing options. Let’s explore the key options below.
User Information
The User Details screen enables users to update personal information like name, gender, address, and phone number, and also upload a photo.
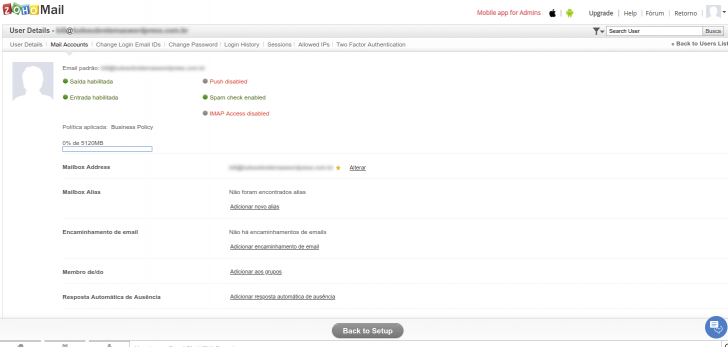
Email Accounts
The email account administration screen allows users to control features like POP access, IMAP, and Spam filter. The administrator can monitor the user’s storage usage, with a free mode limit of 5 GB per user. Additionally, users can create email aliases, set up forwarding, join a group, or enable automatic email responses.
Other available resources
The user management section includes additional tabs for managing specific account details. Notably, the Change Password tab allows password modification, while the Login History tab displays all user logins for the account.
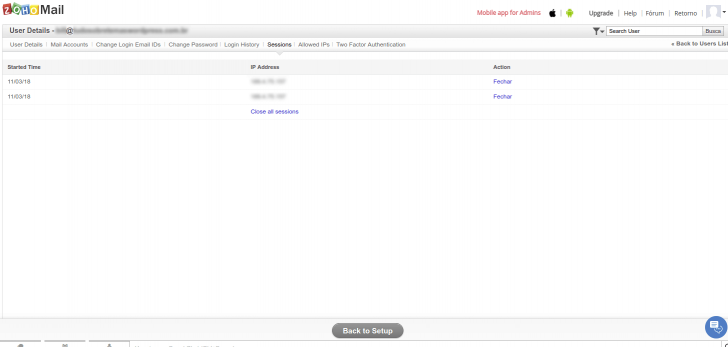
The Sessions tab lists the open sessions available to the user, offering a security advantage by enabling the termination of any session associated with the account. This feature proves helpful in cases of account compromise or when a user forgets to log out on an unfamiliar device.
The Allowed IPs tab enables you to specify a range of IP addresses that can access the account. This is particularly beneficial for businesses using fixed IPs to restrict account access to the company network.
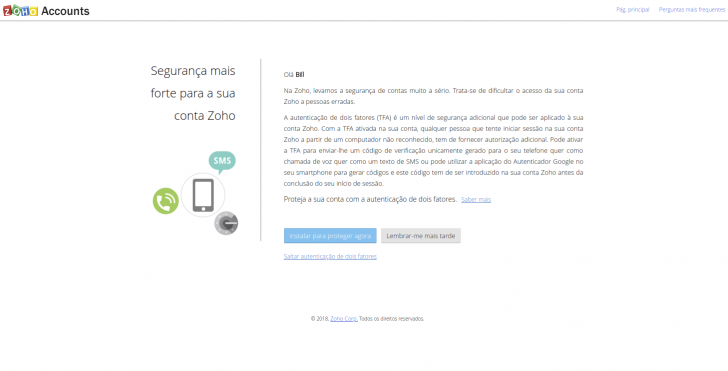
In the Two Factor Authentication tab, you can activate an additional security measure for your account, requiring both a password and a randomly generated code from a mobile app or SMS for access.
Email entry
Regular users of the service cannot access the Zoho Mail admin area. They can only utilize the email account, which is the primary function of the service. Access to emails can be gained through webmail in a browser or by setting up an email client like Outlook or Thunderbird on a smartphone or desktop. Free Zoho accounts do not permit access via POP or IMAP, limiting users to Zoho Mail webmail and mobile/desktop apps.
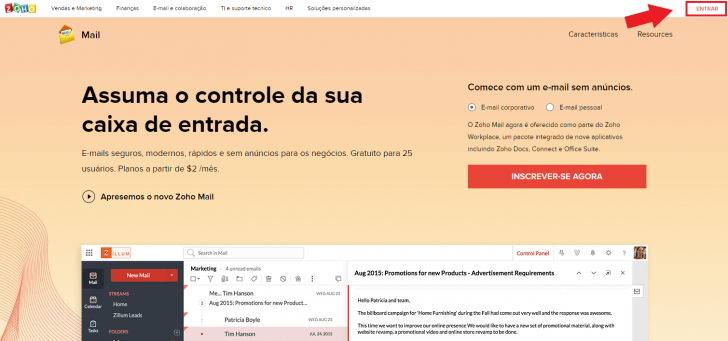
To reach the webmail, go to the www.zoho.com/mail/ website and select the option “Access Zoho Mail” or “Enter” for Portuguese users.
chsyys/PixaBay
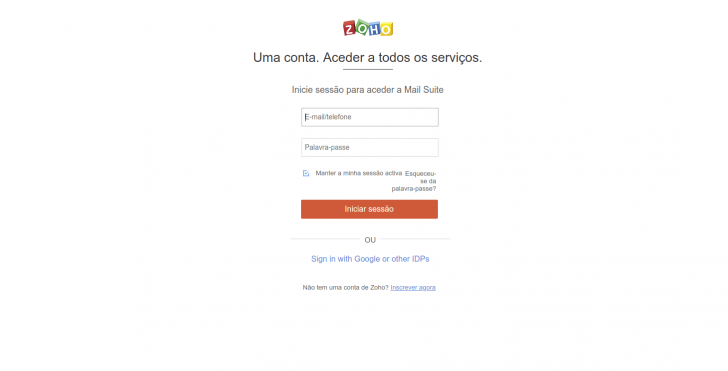
You will be guided to the login page where you can enter your email address and password.
Upon initial email account login, users are prompted to activate two-factor authentication as a security measure. Opting out can be done by selecting “remember later” or “save two-factor authentication,” with the option to enable it later whenever desired.
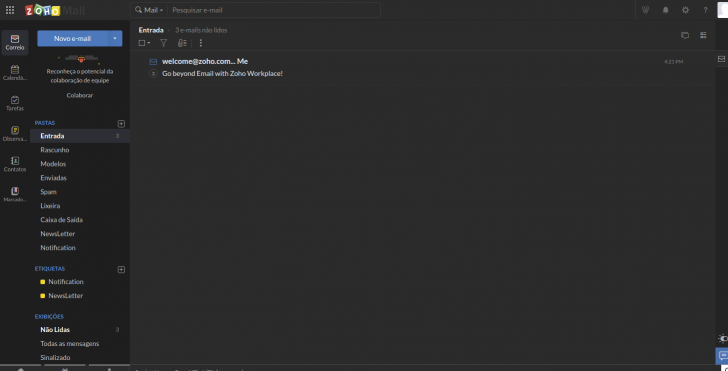
Inbox characteristics
The Zoho Mail inbox offers the typical features of a high-quality email service, along with some additional ones that are reminiscent of other robust email services like Google Workspace and Microsoft 365.
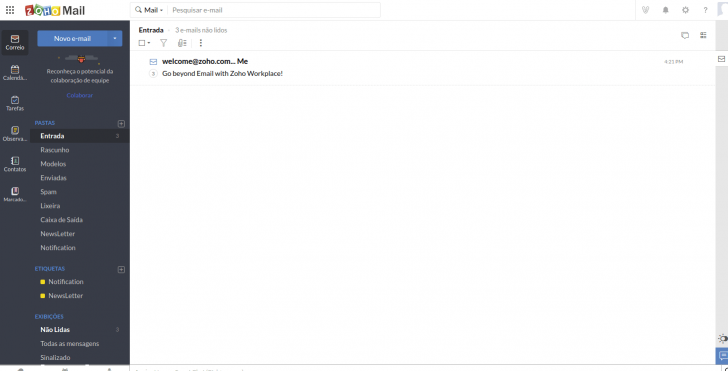
The macro navigation menu on the left provides access to email, calendar, tasks, notes, contacts, and bookmarks. The second column content varies based on the user’s location, such as displaying email folder navigation when accessing emails.
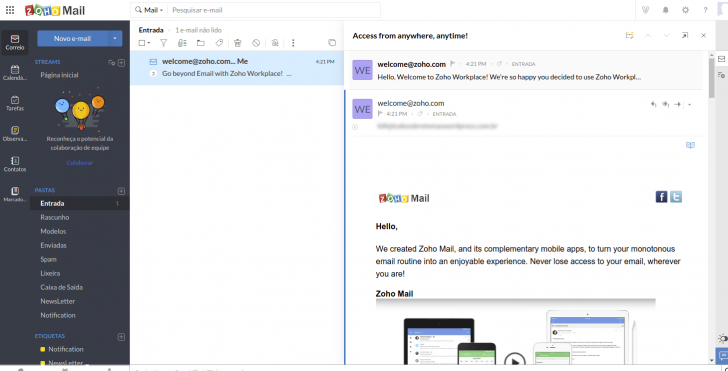
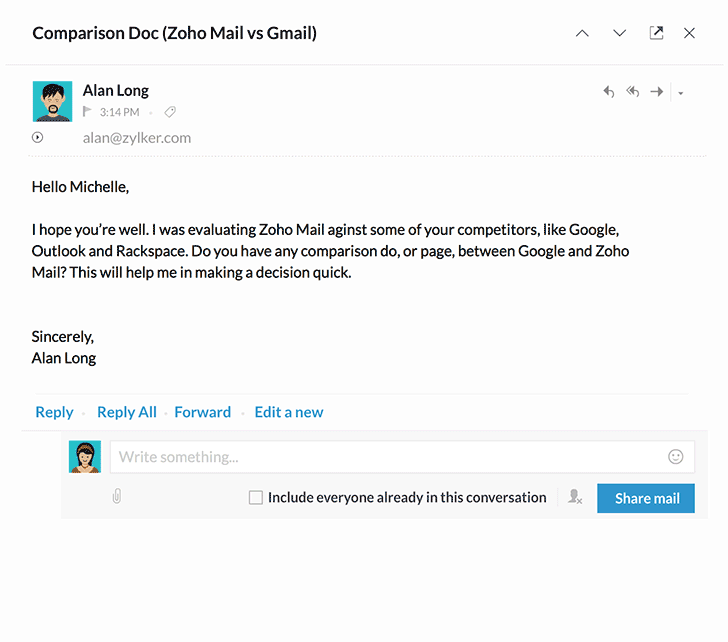
The main section on the page displays a list of emails. Clicking on a message opens it on the same page, dividing the space between the message list and the message content, similar to the layout of Outlook.
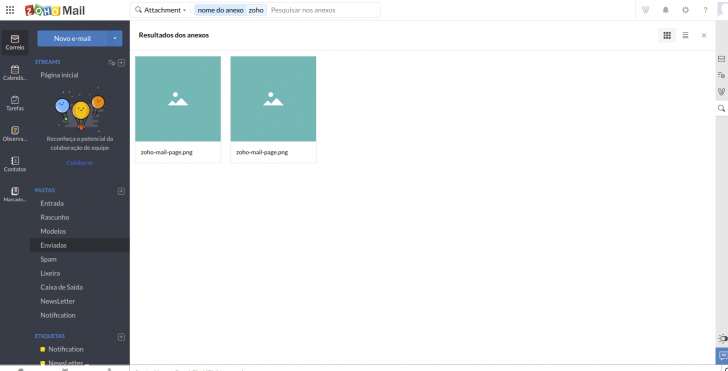
Zoho offers unique features like attachment search in addition to standard email functions. By clicking the clip icon, users can access a dedicated attachments page to search for files specifically attached to sent or received emails.
You can activate night mode in the Zoho webmail interface to darken the screen and improve reading comfort, especially for extended computer use. Simply click on the sun icon in the bottom right corner to enable this feature.
Other characteristics
Zoho Mail offers unique features like Stream, which integrates social network elements into email communication. With Stream, users can quote co-workers in emails to create internal conversations that are limited to company users and not visible to email recipients. This feature streamlines communication and facilitates efficient job resolution within the company.
The additional functions in the webmail interface, including the calendar, tasks, and reminders, are seamlessly incorporated into the email system, providing more than just a basic messaging service.
How to make a professional email: a comprehensive guide.
In conclusion
Zoho Mail offers a comprehensive range of features that rival other professional email services like Google Workspace and Microsoft 365. It provides a valuable option for enhancing your professional profile while remaining competitive with free services like Gmail and Outlook.
If you enjoy the article and wish to test out the service, visit the Zoho website and sign up for a complimentary account!
Published on March 14, 2018 and last updated on September 5, 2024.