


I will explain how to set up an account and optimize a WordPress site on Amazon Lightsail with added features like more storage and a load balancer for better performance and availability. I also suggest reading my review of Lightsail for more information on its capabilities.
Internal indicator.
- Setting up an Amazon account
- Creating Your Instance involves defining what an instance is, choosing its location, selecting a boot script and keys system, and setting identification and tags for the instance.
- What does an instance refer to?
- Establishing where the instance is located.
- Choosing Your System
- Boot Script and Keys
- Defining Your Strategy
- Identification and instance TAGs can be recognized.
- Accessing your instance for the first time involves setting a fixed IP address and obtaining user credentials.
- Setting a fixed IP address
- Obtaining username and password
- Managing your WordPress domain name system on Amazon Lightsail
- Adding storage to your WordPress involves creating a disk for your instance and formatting and mounting the storage within your instance.
- Creating a Disk for Your Virtual Machine
- Formatting and setting up storage on your instance.
- Managing your WordPress snapshot on Amazon Lightsail involves updating your instance plan using a snapshot.
- Modifying your instance plan via a snapshot
- When is a load balancer necessary? Step-by-step setup of a load balancer and managing the network.
- When might I require a load balancer?
- Configuring the load balancer in a sequential manner.
- Network management for load balancers
- In closing
- What does the term “instance” mean?
- Setting the position of the instance
- Choosing Your System
- Boot Script and Passcodes
- Defining Your Strategy
- Identification and specific labels
- Assigning a fixed IP address
- Obtaining username and password
- Creating a Disk for Your Virtual Machine
- Formatting and setting up storage on your instance
- Modifying your instance plan using a snapshot
- When might I require a load balancer?
- Configuring the load balancer in a detailed manner
- Network management for load balancers
Compare different options and select the optimal WordPress hosting solution if you are unsure where to host your WordPress site.
Setting up an Amazon account
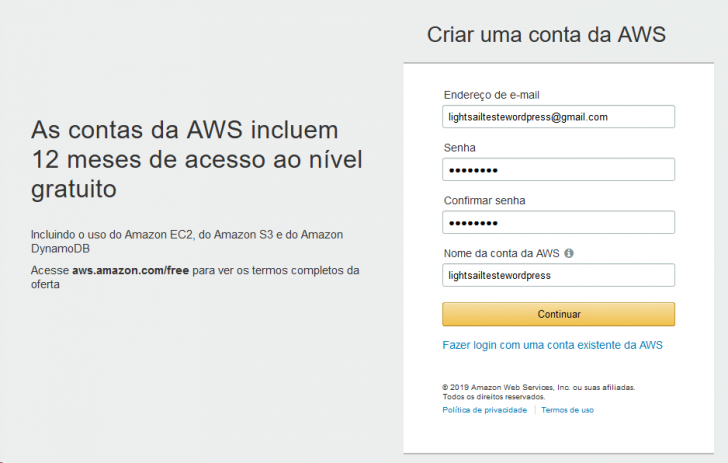
Before using Amazon Lightsail, an account must be created by providing an email and accessing the link https://aws.amazon.com/en/lightsail/. Upon reaching the registration page, click on “Start to use for free,” where Amazon provides 30 free days for the smallest instances on Windows/Linux plans. Existing Amazon users can simply log in, while new users will need to create a new account as shown in the screenshot.
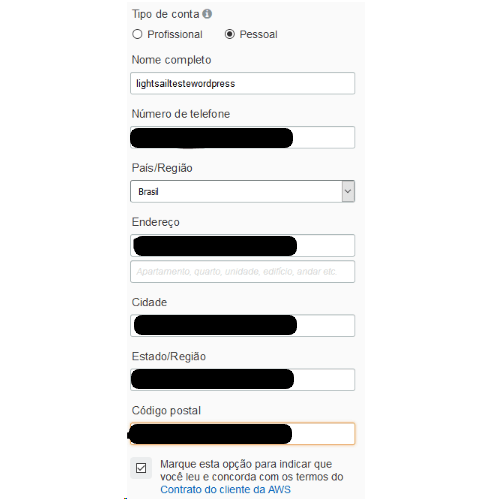
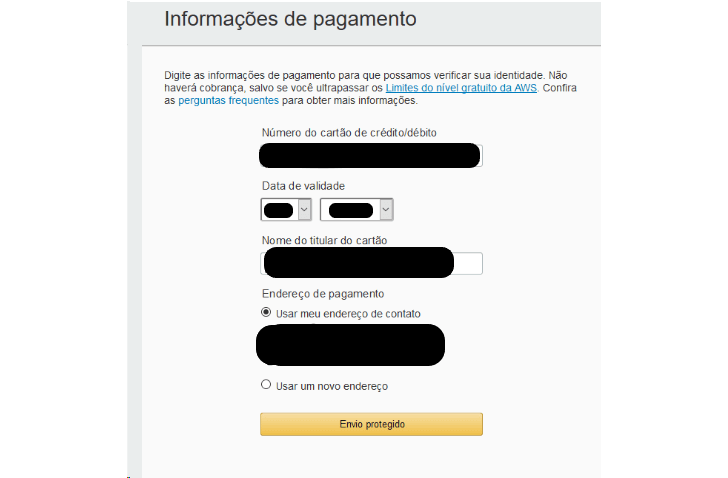
When creating an AWS account, users need to provide a payment method for validation, even if they are using the free services. A small amount, typically a few cents or up to R$ 1, may be charged to validate the card, but this amount is refunded later.
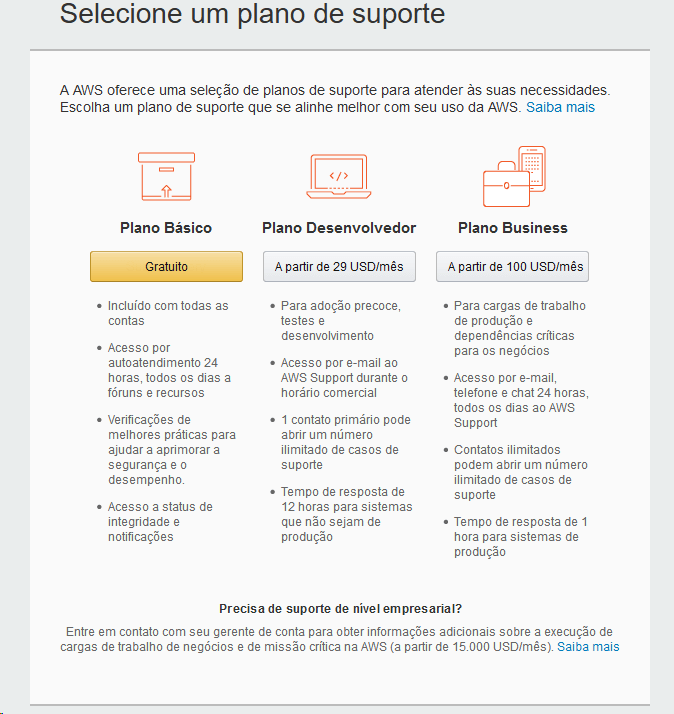
After completing the previous steps, you will be asked to provide a mobile number. Once you enter the number, a validation code will be sent to you via SMS. Next, you will be directed to select a support plan that fits your requirements.
After completing the registration process and selecting a support plan, log in using the created user account. During the initial login, select the default panel language. While a tutorial for starting the first instance is recommended, you have the option to skip this part.
Setting Up Your Instance
What does “instance” mean?
Before we continue, let’s briefly discuss the concept of an instance. An example of an instance is when a server is virtualized using software such as VMWare, allowing you to use a single physical server for multiple virtual servers. In this case, the virtual servers are considered instances. This explanation is a brief overview, as a more detailed discussion would require a separate article.
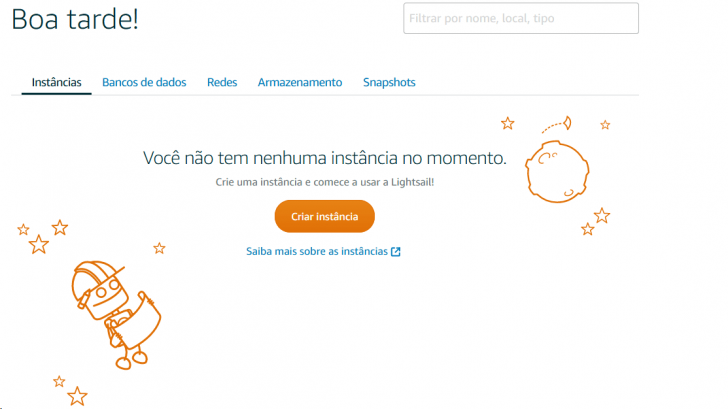
Creating an instance on Amazon Lightsail is a straightforward process. Simply click the orange button located at the center of the “Create Instance” page, as shown in the image.
Establishing the location of the instance
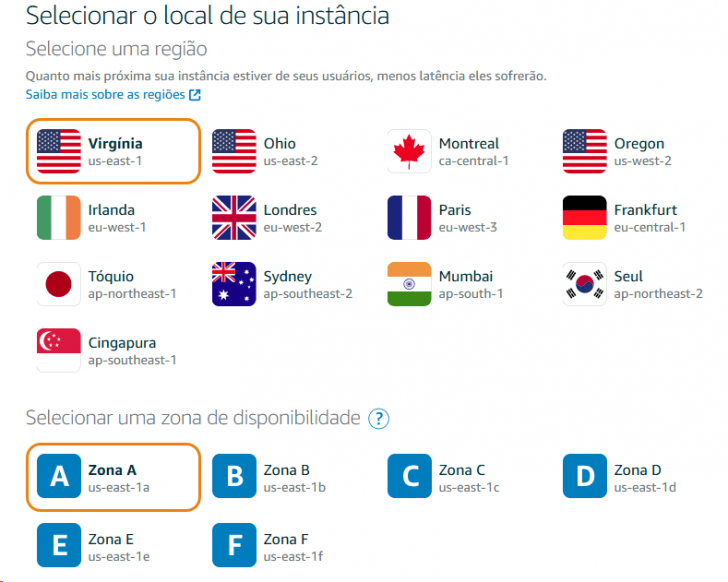
After initiating the creation process, several elements must be determined. The initial step involves selecting the installation location for your instance. By default, the setup is configured to Virginia, Zone A, in the U.S., and we will maintain this setting.
Choosing Your System
The next stage involves selecting between a Linux or Windows operating system and opting for a template that comes with pre-installed and configured applications. Here, we will opt for the Linux OS and the WordPress template.

Boot Script and Security Codes
One of the optional features in the following procedure is crucial: the SSH key, which will be necessary in the future. You have the choice to either generate a new key or utilize the system’s default pattern. The key can be downloaded either during this stage or after the instance is set up.
Advanced users or particular applications may need to execute a script upon the operating system’s startup. Amazon Lightsail offers this capability as an option, which can be set up either immediately or at a later time.
Defining Your Strategy
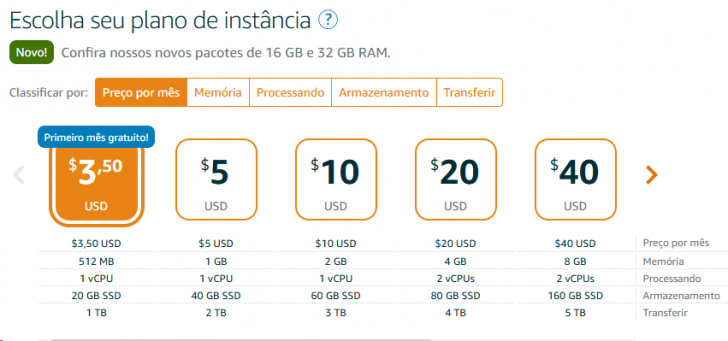
We need to select a plan for your WordPress on Amazon Lightsail. If we opt for the first choice, it will be free for the initial month.
Identification and instance labels
Each instance must be assigned a unique identification name, which is essential for filtering and setting permissions for specific services. This is particularly important when sharing an account with others or creating financial reports based on instance costs.
Click on “create instance” and then wait for the instance to be created.
Accessing your instance initially
After creating an instance, the initial screen is displayed where you can manage all the settings of your environment.

If you access the public IP provided by Lightsail in your browser, you will find that WordPress is already up and running in its default configuration. However, this public IP is temporary, so you must assign a static IP address.
Assigning a fixed IP address
Click the three dots beside your instance and choose “Manage” to configure a static IP address.
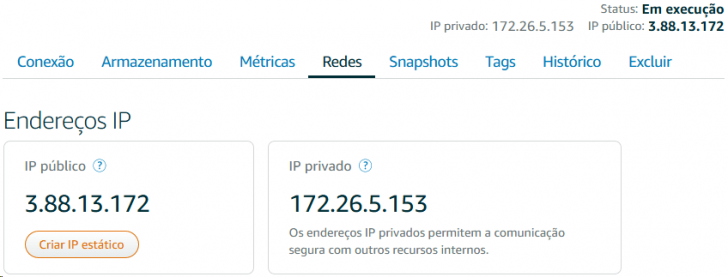
In the “Networks” tab, you can find both the private IP (AWS network address) and the temporary public IP. It’s crucial to set up a static IP to avoid changes whenever the instance is restarted or a new environment is created.
On the creation screen, you must select the location, instance, and a name for the IP configuration.
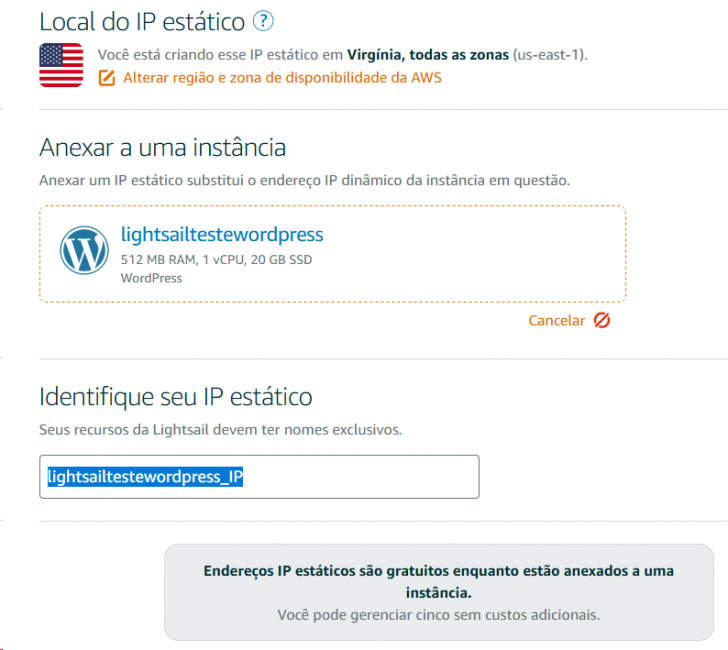
Lightsail, along with all AWS services, takes pride in its organization and the ability to interconnect everything. If you want to link any AWS service to this WordPress instance using an IP address, this identification will be utilized.
Obtaining username and password
Users are established with the “root” standard for the operating system and “user” for WordPress.
To retrieve the password of your WordPress user, you need to access the operating system terminal of your instance. To do this, click on the terminal icon next to the three dots.

A window will appear displaying the terminal screen where you need to input the command “cat bitnami_credentials.” Upon pressing Enter, your WordPress login details will be revealed.

To copy the password, simply highlight it with the mouse in the window and utilize the icon located in the right corner of the window’s footer.

chsyys/PixaBay
The password for the root user in the operating system is not required to be altered presently, but for security purposes, it is advisable to modify it in the future. To accomplish this, access the terminal through the dashboard or SSH and execute the sudo passwd command to set a new password for the root user.
Managing your WordPress domain name system on Amazon Lightsail
Your WordPress site can be accessed on the Internet using the public IP address. To use a domain name, you need to register one with a company like Registry.br or any other service provider.
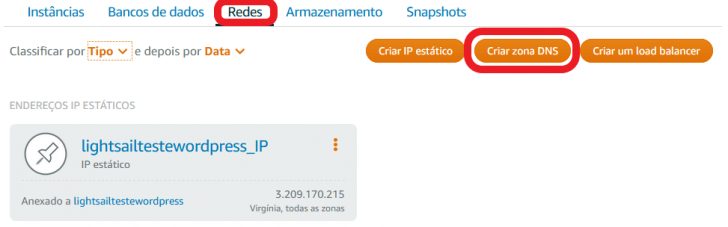
After registering your domain, you need to set it up in your WordPress instance on Amazon Lightsail. To do this, go to the “Networks” section on the Lightsail homepage and then select “Create DNS zone” as shown in the screenshot.
It is important to provide the name of the registered domain on the next page. Tags can be utilized for better organization and administration.

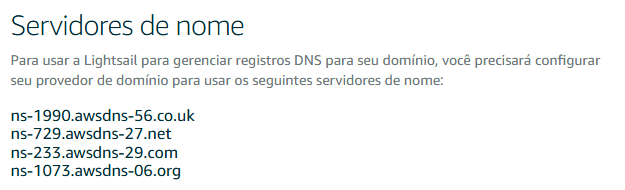
Amazon’s “name servers” need to be updated at the domain registration location to allow Amazon DNS servers to manage the DNS Zone. For more information, refer to the guide on directing a domain to a hosting service.
A name server change may take up to 72 hours to fully propagate, but typically it happens within 2 hours.
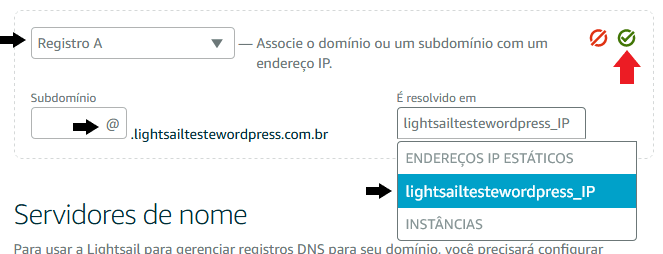
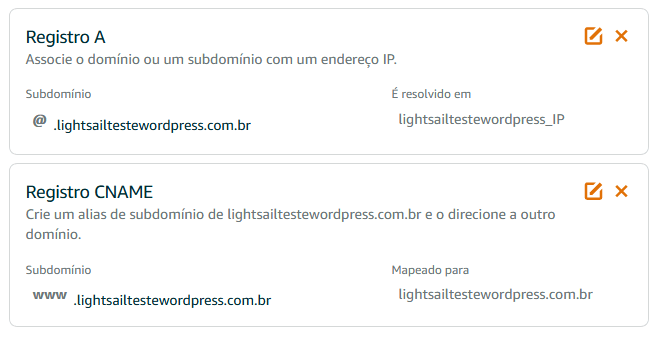
After this time frame, we can link our instance’s IP to the specified domain by creating a type A DNS record. Use an “@” in the subdomain field and select the previously registered IP address. Then, click on the designated icon as shown in the screenshot.
It is crucial to include a CNAME DNS record for the “www” subdomain as shown in the image.
Expanding the storage capacity of your WordPress website
Certain websites or blogs may require more disk space, particularly for images, videos, or audio files. When it comes to audio and video content, it is advisable not to use server storage but instead utilize free platforms like YouTube and Vimeo to embed your content on your website without using up hosting disk space or bandwidth.
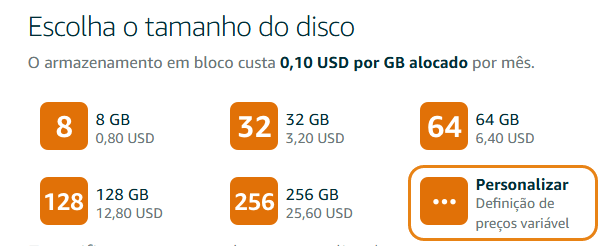
Amazon Lightsail provides separate storage plans for websites with low traffic but requiring more disk space than typical hosting plans offer. This allows users to increase disk space by adding more disks at a more affordable cost without changing their current plan. Here are some examples of the pricing for this storage plan.
chsyys/StockVault
Creating a Disk for Your Virtual Machine
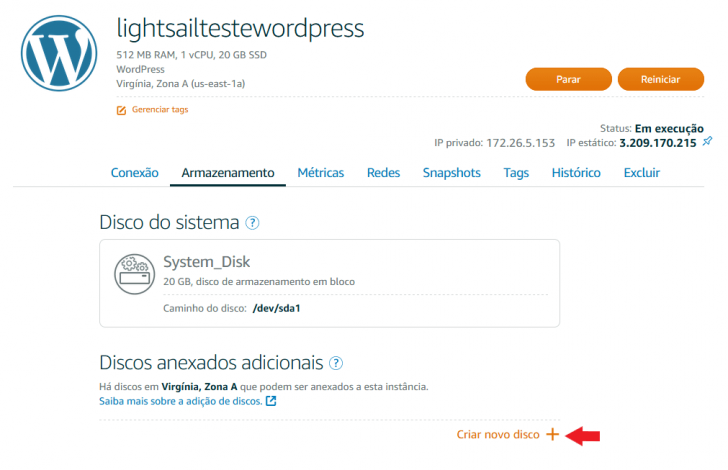
To set up a disk on your instance, navigate to “Manage,” click on the three dots, and choose “Create new disk” under the “Storage” tab, as shown in the screenshot below:
You can choose the disk’s region, storage plan, name, and ID tag on the following screen in the Lightsail management panel.
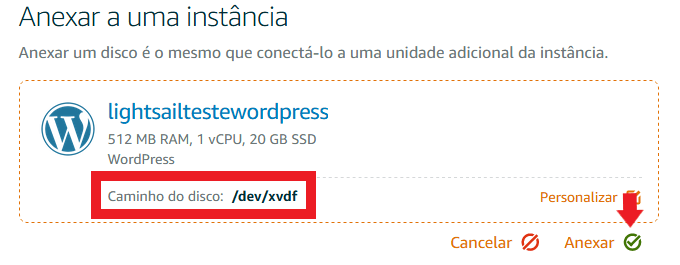
Next, you need to choose the specific instance to which this disk will be connected. Refer to the image provided below:

Click on the “green corner” at the bottom right to attach the disk. Note the address where the disk will be attached, such as “/dev/xvdf”, within the Linux operating system.
Formatting and setting up storage on your virtual machine
To format and attach your disk to your instance on Linux, you can follow a user-friendly tutorial provided by Amazon.
After setting up your disk, you must connect it to your WordPress installation. By default, WordPress stores media files in the wp-content/uploads directory, located at /opt/bitnami/apps/wordpress/htdocs/wp-content/uploads in this Lightsail image.
How can we make use of the additional storage space in WordPress without altering the original installation or operating system structure? By employing the WordPress Media Library Folders plugin and setting up a shortcut to the new disk in the uploads directory.
Access the terminal of your instance that you previously used to obtain your credentials at the start of the article, and go to the upload directory by executing the command:
Change directory to /opt/bitnami/apps/wordpress/htdocs/wp-content/uploads.
We need to make a symbolic link in the folder that points to the directory where the disk was mounted. For example, if the disk was mounted on /media and a symbolic link named media was created inside uploads, the command and link created would be as follows:
Create a symbolic link in the media folder using the command “sudo ln -s /media .”
chsyys/Burst

After installing the plugin and setting up the symbolic link, a new option called “Media Library Folders” will appear in your WordPress admin panel. Click on “Check for new Folders” to add a new directory.
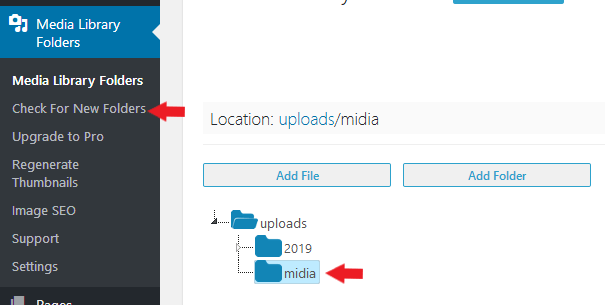
All images or files added to this folder will now be stored on the new disk, utilizing only its allocated space.
As a distinct disk, it can be moved between instances without losing any data, which can be very helpful during system or migration changes.
Managing Your WordPress Backup on Amazon Lightsail
Amazon Lightsail provides a snapshot feature that allows you to create a copy of your instances, which can be beneficial for situations like testing WordPress plugins without affecting your working environment. In case of any issues, you can revert your instance to a stable state using this image.
To generate a snapshot, navigate to the “Manage” section in your instance and click on “Create snapshot” in the snapshot tab. The process will be completed in a few minutes.
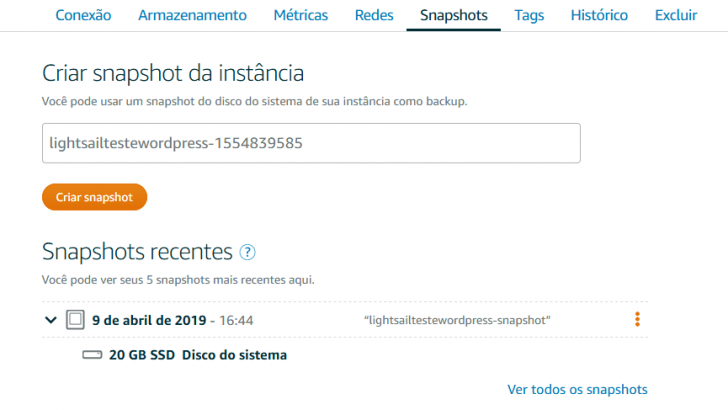
Generating a snapshot should be done while the instance is shut down to avoid corrupting open files, especially those containing database information.
Modifying your instance plan using a snapshot
Snapshots can be utilized for various purposes, such as adjusting the computational capabilities of your WordPress instance on Amazon Lightsail without starting anew or depending on hosting support for migration.
To adjust computing resources, you can generate a fresh instance from a snapshot by selecting the three dots and choosing “Create a new instance,” as shown in the screenshot provided.
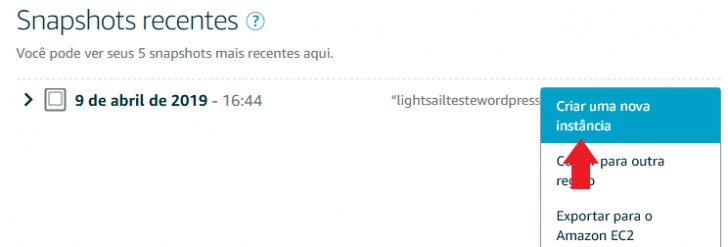
After completing this step, the subsequent page involves generating a new instance, as stated earlier in the article. From there, you simply need to select the plan that best suits your requirements.
It is essential to highlight that adjustments will need to be made to the IP, DNS, and other settings that have been configured, as well as changing the name to match the new instance created.
Utilizing a load balancer
The Load Balancer in Amazon Lightsail is a compelling feature that provides a straightforward and effective solution for distributing access among multiple instances of the same application, enabling load balancing.
When might I require a load balancer?
In high-traffic situations, websites may experience server instability, slow speed, and issues with user access. The key question is whether to enhance server resources to address the demand, which requires evaluating the overall environment and considering three specific questions.
- Is this volume temporary or ongoing?
- Is there a way to enhance my website’s efficiency, such as by resizing images and hosting videos on platforms like YouTube or Vimeo to decrease resource usage?
- Should I be concerned about the site’s high availability?
The need for a load balancer is implied when the initial response is “temporary”, as seen in scenarios such as e-commerce stores increasing platform instances during peak periods like Black Friday to manage high customer traffic and prevent website downtime.
Using a load balancer can help save costs by only incurring additional expenses on the days when peak access is temporary, rather than maintaining fixed resources throughout the year.
Configuring the load balancer in a detailed manner
To set up a Load Balancer on Amazon Lightsail, you need to start by taking a snapshot of your existing instance. Make sure to turn off the original instance to prevent any data loss. Once the snapshot is created, proceed to create a new instance based on it, which can have the same or different resources compared to the original one.
The new instance should be created in the same location, but it can be in various areas within that location to enhance resource availability and add a layer of physical security due to the multiple data center locations.
We will set up the load balancer after launching both environments. To begin, navigate to the networks tab on the Home page and select “Create Load Balancer.”

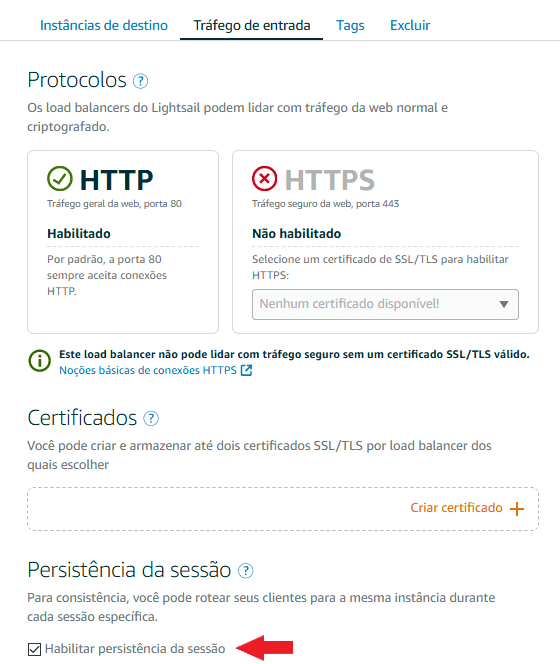
We need to select the region on the following page, matching the location of the instances, and decide between using HTTP or HTTPS. It’s important to note that Amazon Lightsail provides a complimentary HTTPS certificate. Additionally, we will assign an ID name to the load balancer and utilize TAGs if necessary.
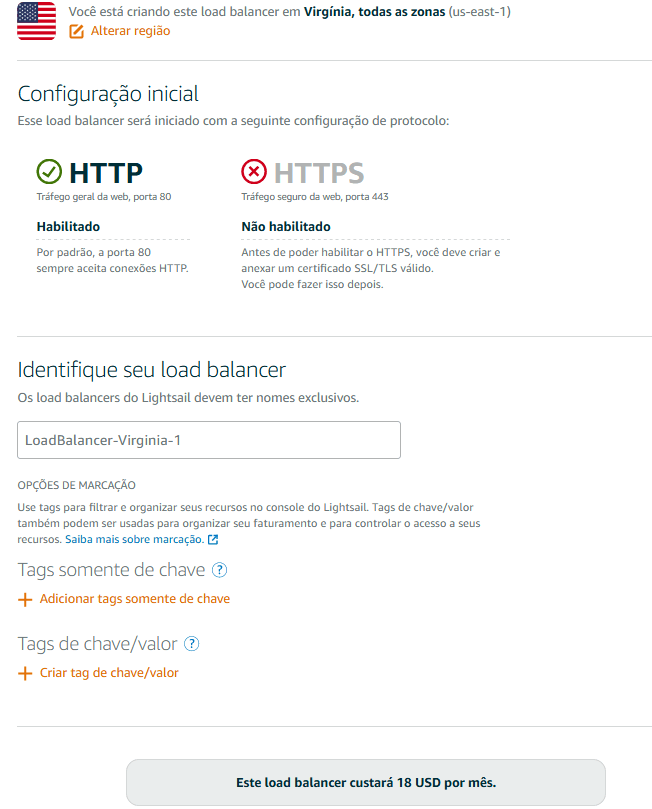
At the end of the page, you will find information about the cost of the load balancer service. While the cost may seem high, it can be significantly lower than the potential revenue loss from website downtime. Your decision should be based on your specific requirements and the level of risk you are willing to accept.
On the next page, we need to connect the instances to the load balancer that was set up.
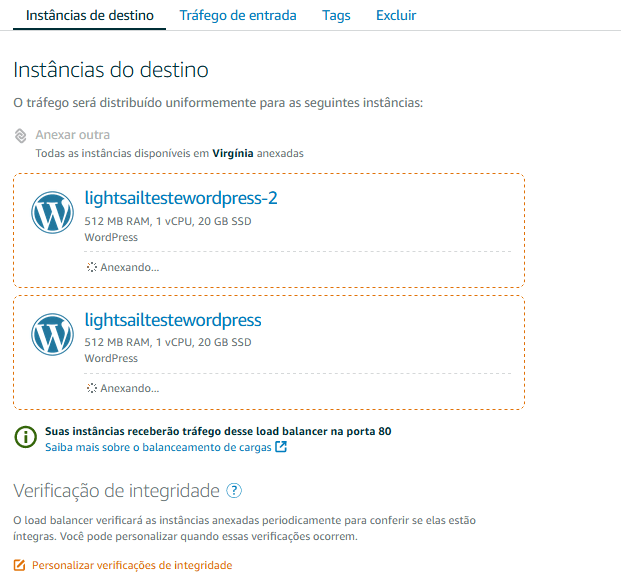
Enabling session persistence in the “Input Traffic” tab is crucial for maintaining user sessions when traffic is switched to a different instance. This configuration is unnecessary for websites that do not require user logins.
Managing the network of load balancers.
To complete the high availability setup for WordPress on Amazon Lightsail, we must modify the networking aspect of the services. Initially, we need to assign a static IP to the new instance, similar to the process described earlier in the article.
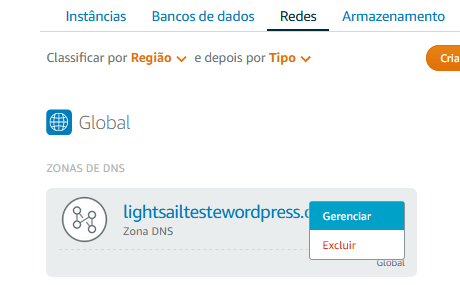
We need to update the DNS configuration to point the domain to the load balancer instead of the instance. Access the “Networks” tab on the homepage and select the “Manage” option in your DNS settings.
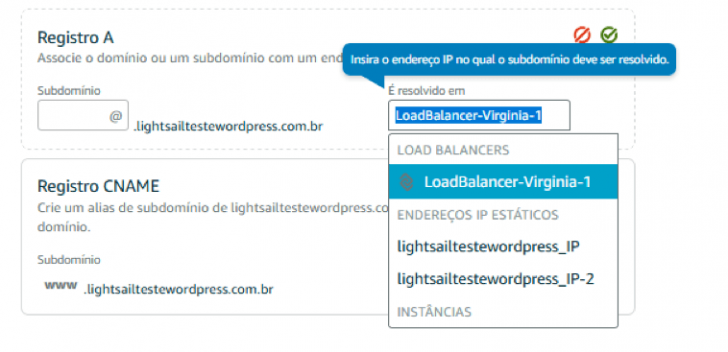
On the DNS Zone management page, we need to update Registry A to load balancer, as shown in the screenshot below.
chsyys/DepositPhotos
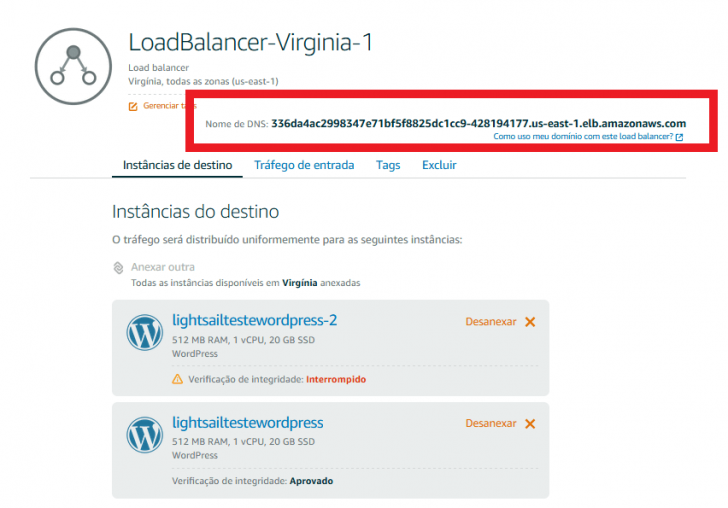
After finishing the setup, select the “green corner” to activate your load balancer completely. You can test its functionality by using your domain, if it’s set up correctly, or by utilizing the external load balancer address provided by Amazon. This address is accessible in the settings on the same page.
You can conduct tests by randomly turning off instances and attempting to access your site until it goes offline when both environments are disabled, for instance.
Conclusion
I think that by gaining a deeper grasp of how certain features described in this article work, we can appreciate how these modern cloud hosting solutions have simplified the online experience for individuals seeking an Internet platform for their blog, e-commerce site, or any other application.
Amazon Lightsail is in high demand as it provides features that previously required highly skilled professionals to set up using command line, a process that could take hours or days, along with significant costs.
Having the choice of a fast and convenient method to set up and adjust a WordPress on Amazon, ensuring high availability and the ability to scale resources without needing to contact support, not only simplifies operations but also cuts down on expenses.
If you enjoy the idea of moving your existing setup or setting up a sophisticated blog with the simplicity provided by Amazon Lightsail, visit aws.amazon.com/en/lightsail/ to sign up or discover other WordPress hosting options.
Publication date: 25/04/2019 (last updated on 04/07/2020)
Tutorials and WordPress are among the tags used.