


It is important to prioritize keeping all systems updated for optimal security and performance, including PHP, which is specifically designed for creating dynamic websites and has significantly evolved, particularly with the release of version 7.
This article explains how to determine the PHP version in use and switch to a different version in various situations. Leading PHP hosting services provide a straightforward method for this change. To get started immediately, click on the links provided below.
- Changing the PHP version using the hosting control panel.
- How to manually switch the PHP version
Why upgrade the PHP version
Using PHP versions 7 and above primarily improves performance due to the significant enhancements made to the PHP compiler starting from version 7.0. This results in faster processing speeds, with operations running up to twice as quickly compared to version 5.6, along with reduced memory consumption.
The latest updates have led to the phasing out of certain functions and the introduction of new ones. This could pose challenges for older applications reliant on these functions, making it necessary at times to revert to an older PHP version for compatibility reasons, a more frequent occurrence than expected.
Fortunately, newer applications like WordPress, which receive regular updates, are equipped to support the most recent PHP versions.
It is highly beneficial to maintain the most recent PHP version on your server, but this may not always be feasible if certain applications rely on functions found exclusively in older compiler versions. Hence, the necessity for both upgrading and downgrading PHP versions may arise.
Identifying the PHP version on your hosting server
It is important to determine the current PHP version before making any changes. Identifying the PHP version is a straightforward process, as outlined below.
There is a specific function available to show various PHP settings in the browser, such as the compiler version. To do this, create a new file in Notepad or your chosen code editor and input the provided code.
Save the file with the desired name and add the .php extension, for example, info.php. Transfer the file to the server using your chosen method (FTP, SSH, or hosting file manager). Once uploaded, access the file’s URL in your web browser (e.g., mysite.com/info.php). If everything is done correctly, you will see a page displaying a table with various environment information, including the PHP version highlighted at the top left of the table.

Now that we have identified the PHP version we are using, we can proceed with the version update.
A caution prior to beginning
It is essential to clarify that the instructions provided focus on switching the PHP version from the available hosting options.
The PHP interpreter is required to be installed on the server, but clients using shared hosting usually cannot install new versions themselves. Hosting companies typically offer a range of PHP interpreter versions for clients to use.
The PHP interpreter allows multiple versions to run concurrently, unlike other programs where installing a newer version typically disables the older one. This unique feature enables users to select the version they prefer easily.
If you are using a dedicated VPS or unmanaged hosting, you need to install the compiler yourself before following the provided instructions.
Instructions for installing PHP on the server are not provided here, but you can find them in online tutorials by searching for your operating system along with the keywords “Install PHP.”
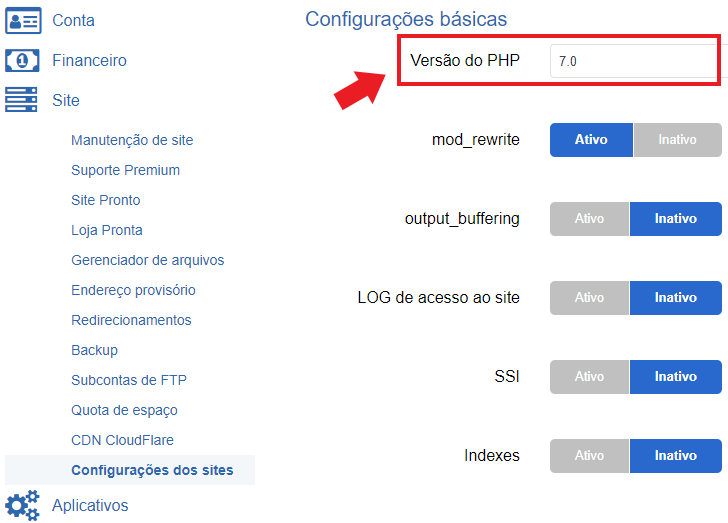
Method 1: Modifying the PHP version via the control panel
There are user-friendly options available to easily change the PHP version in hosting, which can be done through the hosting control panel included in popular website hosting plans.
The control panel location and process can differ between companies as it is not standardized. However, it is typically easy to find and modify this setting on the dashboard. Let’s explore where to find this feature in various control panels.
cPanel
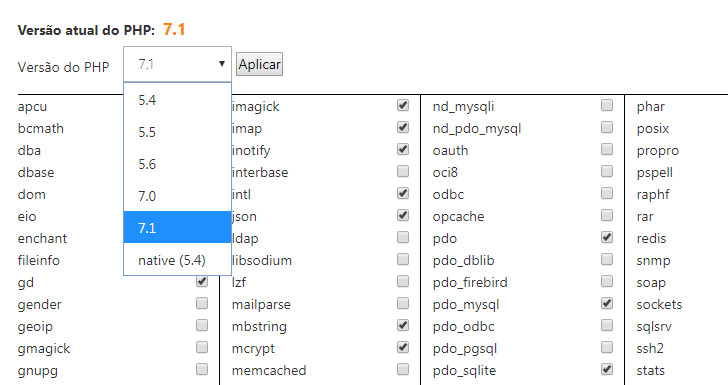
Several companies like HostGator, GoDaddy, Bluehost, and SiteGround use cPanel. The option to change the PHP version can be found in the “PHP version” or “PHP selector” section, despite interface variations.
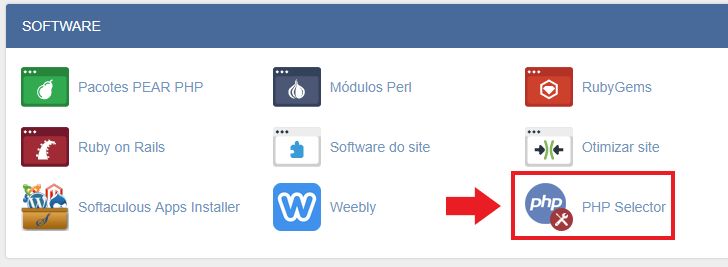
When you enter the area, you will see a checkbox showing the current version. You can click on the arrow to see all the available versions. Choose the version you want and save the updated settings.
Plesk
The Plesk control panel is a popular choice for companies that provide Windows hosting and can be used with both Linux and Windows servers.
The choice to adjust the PHP version can be found in the “Hosting settings” section, which contains various options for hosting configuration.
Scroll to the section labeled “Web scripting and statistics” and adjust the PHP version by selecting the appropriate option under “PHP support”.
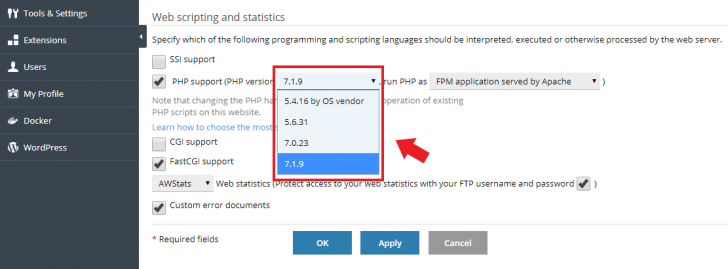
You can decide if PHP will be served by Apache or NGINX by selecting the option in the checkbox provided at the end of the line.
After selecting the preferred version, simply click the “Apply” button to implement the new settings on the server.
Other dashboard interfaces
If your hosting provider offers a control panel but does not use cPanel or Plesk, you may still have the option to change the PHP version. Below are the locations of this option in some popular companies in Brazil.
UOL Host
At UOL Host, you can make the change by navigating to the “Hosting” section and selecting “Advanced Settings”. From there, scroll to the “Settings” section and click on the “Change” option.
Choose the preferred option and then click “save”.
KingHost – a hosting provider
At KingHost, you can modify the PHP version in the dashboard section labeled “Fix Configuration”.
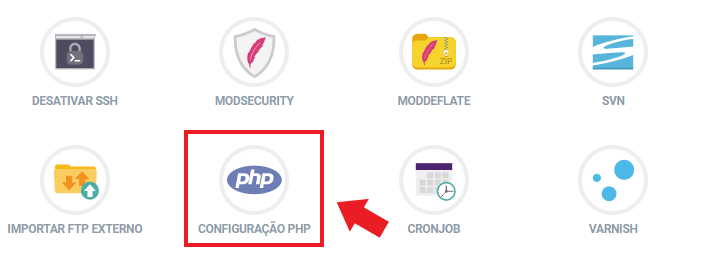
The preferred version of PHP can be easily selected in this section, which is the first option visible among other language settings.
Locaweb – a company or brand name.
To update the PHP version on Locaweb, access the “Website Hosting” section in the customer dashboard. Locate the desired domain and select “Administrate Site”. Scroll down to “General Information” and choose “Set Version” to make the necessary change.
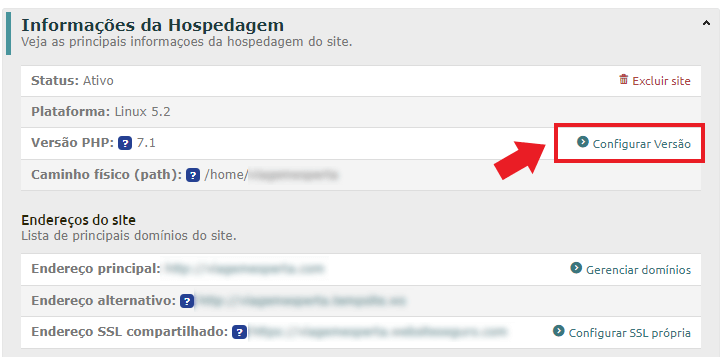
Choose the preferred option on the following screen and click the “Ok” button. It will take approximately 15 minutes for the modification to be implemented on the server.
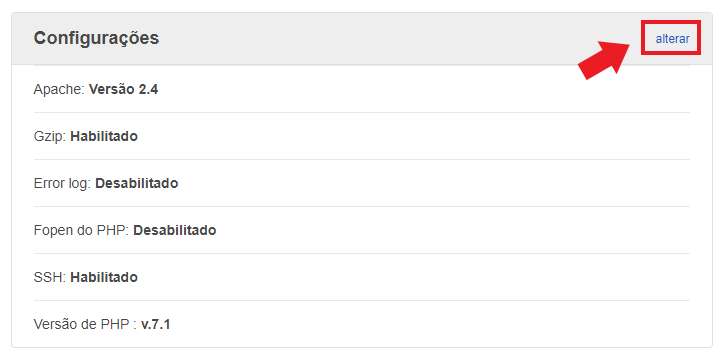
Hostnet is a web hosting company.
At Hostnet, you can modify the PHP version under the “Website” section by choosing the desired version and saving the changes using the “Save site” button in the “Configurations” menu.
chsyys/FreeImages
Method 2 involves manually altering the PHP version.
To switch the PHP version on your hosting server, the provider must have it set up. If you’re unsure about the available version, consult your hosting documentation or contact support.
The PHP version you want is accessible on your hosting, and you can set up the server to use it instead of the default version, which can be straightforward in certain situations.
Apache web server configuration using .htaccess
The Apache web server is currently the most popular choice on the internet, despite facing competition from NGINX. It maintains its position as a top player, powering approximately 44% of all active websites globally.
Apache’s .htaccess file is decentralized and can be utilized to modify server settings for certain directories, such as the PHP version. By adding a single line to this file, users can switch the default PHP version. Simply select the preferred version and input the directive into the .htaccess file situated at the site’s root directory.
If the .htaccess file is missing from the site’s root directory, you can create an empty one with a specific rule. To use a different PHP version in another directory on the same hosting, create a .htaccess file and apply the rule to the site, affecting all subfolders.
The required edition should be installed in advance by your hosting provider.
IIS web server
IIS is a Microsoft web server known as Internet Information Services. It can also support running multiple PHP versions simultaneously, although the setup process is more complex.
You should set up the environment variables with the path to the preferred PHP version’s root and the dynamic libraries. Once this is done, specify the locations for running each chosen PHP version. Ensure that the desired PHP version is present on the server before configuring. For detailed instructions, refer to the Microsoft documentation provided.
If the PHP version you need is not already installed, you can install it using Microsoft’s Web Platform Installer. Refer to the comprehensive guide for installing and setting up PHP on Windows IIS available here.
NGINX software for serving websites
The NGINX web server has become increasingly popular in recent years and is now being utilized by major companies like CloudFlare and WordPress.com. Its growing usage can be attributed to its exceptional performance and flexible configuration capabilities. In addition to serving as a conventional web server, NGINX can also function as a reverse proxy, allowing for request management before processing. This flexibility enables its integration with other servers like Apache. Furthermore, its efficient caching system contributes to enhancing internet speed.
If your shared hosting plan includes NGINX, it might be set up as a reverse proxy alongside another server like Apache. To switch the PHP version in Apache, follow the provided guidelines. If not, you’ll require administrator rights to adjust NGINX settings via SSH.
NGINX enables the setup of multiple PHP versions to run concurrently by separately installing each version and configuring it for the intended site. Detailed technical instructions are available in a comprehensive Portuguese tutorial on NGINX and PHP installation, as well as in an article demonstrating the configuration of multiple PHP versions running simultaneously.
In conclusion.
Changing the PHP version might be required for different reasons, such as benefiting from improved performance or ensuring compatibility with older applications. Switching PHP versions can be a straightforward process, particularly when using the hosting control panel.
If you have any inquiries or want to contribute additional details to the article, please leave a comment, and we will gladly engage with you. 🙂
Published on 01/02/2018 and revised on 26/08/2023.
PHP tutorials are labeled with tags.